Category:Tactile paving at train stations in Australia
Jump to navigation
Jump to search
Countries of Oceania: Australia
Subcategories
This category has only the following subcategory.
Media in category "Tactile paving at train stations in Australia"
The following 200 files are in this category, out of 322 total.
(previous page) (next page)-
 Accessway beteween TGSIs and structure, Central Station, Brisbane IMGP2011.jpg 3,008 × 2,000; 2.67 MB
-
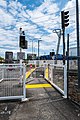
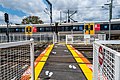
 Active maze level crossing Sunshine Railway Station Bilsen Rd Geebung L1010674.jpg 8,368 × 5,584; 37.16 MB
-
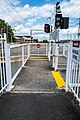
 Active maze level crossing Sunshine Railway Station Bilsen Rd Geebung L1010675.jpg 5,584 × 8,368; 31.49 MB
-
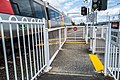
 Active maze level crossing Sunshine Railway Station Bilsen Rd Geebung L1010676.jpg 8,368 × 5,584; 32.05 MB
-
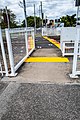
 Active maze level crossing Sunshine Railway Station Bilsen Rd Geebung L1010677.jpg 5,584 × 8,368; 29.28 MB
-
 Active maze level crossing Sunshine Railway Station Bilsen Rd Geebung L1010678.jpg 5,584 × 8,368; 35.02 MB
-
 Active maze level crossing Sunshine Railway Station Bilsen Rd Geebung L1010679.jpg 5,584 × 8,368; 32.62 MB
-
 Active maze level crossing Sunshine Railway Station Bilsen Rd Geebung L1010680.jpg 8,368 × 5,584; 30.75 MB
-
 Active maze level crossing Sunshine Railway Station Bilsen Rd Geebung L1010681.jpg 8,368 × 5,584; 33.69 MB
-
 Active maze level crossing Sunshine Railway Station Bilsen Rd Geebung L1010682.jpg 8,368 × 5,584; 30.74 MB
-
 Active maze level crossing Sunshine Railway Station Bilsen Rd Geebung L1010683.jpg 5,584 × 8,368; 31.82 MB
-
 Active maze level crossing Sunshine Railway Station Bilsen Rd Geebung L1010684.jpg 8,368 × 5,584; 34.95 MB
-
 Active maze level crossing Sunshine Railway Station Bilsen Rd Geebung L1010685.jpg 5,584 × 8,368; 33.3 MB
-
 Active maze level crossing Sunshine Railway Station Bilsen Rd Geebung L1010690.jpg 8,368 × 5,584; 28.2 MB
-
 Active maze level crossing Sunshine Railway Station Bilsen Rd Geebung L1010691.jpg 8,368 × 5,584; 30.79 MB
-
 Airport Train arrives Platform 1 Fortitude Valley Station Brisbane P1090466.jpg 4,000 × 3,000; 8.19 MB
-
 Airport train arrives Platform 2 Fortitude Valley Rail Station Brisbane P1070640.jpg 3,000 × 4,000; 7.28 MB
-
 Airport train arrives Platform 2 Fortitude Valley Rail Station P1100606.jpg 4,000 × 3,000; 9.7 MB
-
 Airport train departs Platform 2 Fortitude Valley Rail Station Brisbane P1070641.jpg 3,000 × 4,000; 7.83 MB
-
 Assisted boarding point from SMU carriage Platform 1 Sunshine Rail Station P1100062.jpg 3,000 × 4,000; 8.78 MB
-
 Assisted boarding point from SMU carriage Platform 1 Sunshine Rail Station P1100063.jpg 3,000 × 4,000; 8.78 MB
-
 Assisted boarding point from SMU carriage Platform 1 Sunshine Rail Station P1100064.jpg 3,000 × 4,000; 9.3 MB
-
 Assisted boarding point platform 9 Roma Street Station Brisbane P1320688.jpg 4,000 × 3,000; 11.73 MB
-
 Auchenflower railway station Lang Parade Auchenflower P1110911.jpg 4,000 × 3,000; 9.24 MB
-
 Auchenflower railway station Lang Parade Auchenflower P1110912.jpg 4,000 × 3,000; 8.84 MB
-
 Auchenflower railway station Lang Parade Auchenflower P1110914.jpg 4,000 × 3,000; 9.91 MB
-
 Behind this line is fine sign at Central railway station, Brisbane.jpg 4,032 × 3,024; 4.7 MB
-
 Boarding assistance Platform 9 Roma Street Railway Station Roma St Brisbane P1040881.jpg 4,000 × 3,000; 8.38 MB
-
 Boarding point covered by rainwater Platform 1 Geebung Rail Station P1050933.jpg 4,000 × 3,000; 9.39 MB
-
 Boarding point covered by rainwater Platform 1 Geebung Rail Station P1050934.jpg 4,000 × 3,000; 10.23 MB
-
 Boarding point covered by rainwater Platform 1 Geebung Rail Station P1050935.jpg 4,000 × 3,000; 9.86 MB
-
 Bowen Hills Train arrives Platform 4 Fortitude Valley Station Brisbane P1080328.jpg 4,000 × 3,000; 8.22 MB
-

-

-
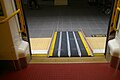
 Brunswick St Platform 4 showing rap up fron lower to raised section DSCF2721.jpg 1,600 × 1,200; 464 KB
-

-

-
 Caboolture train arrives at Sunshine Railway Station Bilsen Rd Geebung P1370917.jpg 4,000 × 3,000; 7.47 MB
-
 Caboolture train arrives Platform 4 Fortitude Valley Station Brisbane P1080462.jpg 4,000 × 3,000; 8.29 MB
-
 Caboolture train arrives Platform 4 Fortitude Valley Station Brisbane P1090279.jpg 4,000 × 3,000; 7.91 MB
-
 Caboolture train arrives Platform 6 Central Station Brisbane P1110840.jpg 4,000 × 3,000; 8.45 MB
-
 Caboolture train arrives Platform 6 Central Station Brisbane P1110841.jpg 4,000 × 3,000; 8.49 MB
-
 Caboolture train arrives Sunshine Railway Station Bilsen Rd Geebung P1370704.jpg 4,000 × 3,000; 6.61 MB
-
 Caboolture train arrives Sunshine Railway Station Bilsen Rd Geebung P1370707.jpg 4,000 × 3,000; 6.09 MB
-
 Caboolture train at Sunshine Railway Station Bilsen Rd Geebung P1370942.jpg 4,000 × 3,000; 5.75 MB
-
 Caboolture train at Sunshine Railway Station Bilsen Rd Geebung P1370943.jpg 4,000 × 3,000; 6.04 MB
-
 Caboolture train at Sunshine Railway Station Bilsen Rd Geebung P1380645.jpg 4,000 × 3,000; 10.96 MB
-
 Caboolture train departs Platform 4 Fortitude Valley Station Brisbane P1060581.jpg 4,000 × 3,000; 7.81 MB
-
 Caboolture train departs Platform 4 Fortitude Valley Station Brisbane P1060728.jpg 4,000 × 3,000; 7.6 MB
-
 Caboolture train departs Platform 4 Fortitude Valley Station Brisbane P1080463.jpg 4,000 × 3,000; 7.44 MB
-
 Caboolture train departs Platform 4 Fortitude Valley Station Brisbane P1090280.jpg 4,000 × 3,000; 6.9 MB
-
 Caboolture train departs Platform 6 Central Rail Station P1110507.jpg 4,000 × 3,000; 8.36 MB
-
 Caboolture train departs Sunshine Railway Station Bilsen Rd Geebung P1370941.jpg 4,000 × 3,000; 5.88 MB
-
 Caboolture train departs Sunshine Railway Station Bilsen Rd Geebung P1370944.jpg 4,000 × 3,000; 5.71 MB
-
 Caboolture train departs Sunshine Railway Station Bilsen Rd Geebung P1380588.jpg 4,000 × 3,000; 9.19 MB
-
 Caboolture train departs Sunshine Railway Station Bilsen Rd Geebung P1380647.jpg 4,000 × 3,000; 9.7 MB
-
 Caboolture train departs Sunshine Railway Station Bilsen Rd Geebung P1380691.jpg 4,000 × 3,000; 8.95 MB
-
 Caboolture train departs Sunshine Station Bilsen Rd Geebung P1370861.jpg 4,000 × 3,000; 5.56 MB
-
 Carriage to platform gap Platform 9 Roma Street railway station Brisbane P1400450.jpg 4,000 × 3,000; 12.06 MB
-
 Carriage to platform gap Platform 9 Roma Street railway station Brisbane P1400451.jpg 4,000 × 3,000; 11.01 MB
-
 Carriage to platform gap Platform 9 Roma Street railway station Brisbane P1400453.jpg 4,000 × 3,000; 11.51 MB
-
 Carriage to platform gap Platform 9 Roma Street railway station Brisbane P1400455.jpg 3,000 × 4,000; 11.31 MB
-
 Central railway station, Brisbane 04.jpg 3,264 × 2,448; 2.15 MB
-
 Central railway station, Brisbane, 2017 (01).jpg 3,718 × 2,432; 3.33 MB
-
 Central railway station, Brisbane, 2017 (02).jpg 3,734 × 2,456; 3.92 MB
-
 Central Station Platforms 5 and 6 Central Rail Station Brisbane IMGP4743.jpg 3,008 × 2,008; 4.39 MB
-
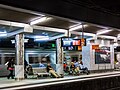
 Chatswood Railway Station platform 3 Chatswood Sydney P1350349.jpg 4,000 × 3,000; 7.37 MB
-
 Chatswood Railway Station platform 3 Chatswood Sydney P1350350.jpg 4,000 × 3,000; 8.17 MB
-
 Commuters and grafittied train Platform 3 Central Rail Station Brisbane P1210847.jpg 4,000 × 3,000; 10.43 MB
-
 Commuters and grafittied train Platform 3 Central Rail Station Brisbane P1210848.jpg 4,000 × 3,000; 11.67 MB
-
 Commuters Platform 6 Central Rail Station Brisbane P1210846.jpg 4,000 × 3,000; 8.91 MB
-
 Commuters Platform 9 Roma St Railway Station Brisbane P1410120.jpg 4,000 × 3,000; 8.3 MB
-
 Commuters Platform 9 Roma St Railway Station Brisbane P1410121.jpg 4,000 × 3,000; 8.58 MB
-
 Commuters Platform 9 Roma St Railway Station Brisbane P1410130.jpg 4,000 × 3,000; 9.39 MB
-
 Commuters Platform 9 Roma Street Railway Station Brisbane P1400744.jpg 4,000 × 3,000; 7.93 MB
-
 Commuters Platform 9 Roma Street Railway Station Brisbane P1400745.jpg 4,000 × 3,000; 8.06 MB
-
 Commuters Platform 9 Roma Street Railway Station Brisbane P1400746.jpg 4,000 × 3,000; 8.3 MB
-
 Commuters Platform 9 Roma Street Railway Station Brisbane P1400747.jpg 4,000 × 3,000; 8.69 MB
-
 Commuters Platform 9 Roma Street Railway Station Brisbane P1410634.jpg 4,000 × 3,000; 9.57 MB
-
 Commuters Platform 9 Roma Street Railway Station Brisbane P1410649.jpg 4,000 × 3,000; 9.34 MB
-
 Commuters Platform 9 Roma Street Railway Station Roma St Brisbane P1400311.jpg 4,000 × 3,000; 8.51 MB
-
 Commuters Platform 9 Roma Street Railway Station Roma St Brisbane P1400312.jpg 4,000 × 3,000; 9.87 MB
-
 Commuters wait on Platforms 8&9 Roma Street Rail Station Brisbane P1290436.jpg 4,000 × 3,000; 11.04 MB
-
 Commuters wait on Platforms 8&9 Roma Street Rail Station Brisbane P1290521.jpg 4,000 × 3,000; 9.87 MB
-
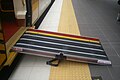
 Decpac boarding ramp Queensland Rail SMU260 Platform 3 Roma St Railway Station IMGP1200.jpg 3,008 × 2,000; 1.97 MB
-
 Decpac boarding ramp Queensland Rail SMU260 Platform 3 Roma St Railway Station IMGP1201.jpg 3,008 × 2,000; 1.95 MB
-
 Decpac boarding ramp Queensland Rail SMU260 Platform 3 Roma St Railway Station IMGP1202.jpg 3,008 × 2,000; 1.97 MB
-
 Decpac boarding ramp Queensland Rail SMU260 Platform 3 Roma St Railway Station IMGP1203.jpg 2,000 × 3,008; 2.12 MB
-
 Decpac boarding ramp Queensland Rail SMU260 Platform 3 Roma St Railway Station IMGP1204.jpg 2,000 × 3,008; 2.21 MB
-
 Decpac boarding ramp Queensland Rail SMU260 Platform 3 Roma St Railway Station IMGP1205.jpg 2,000 × 3,008; 2.38 MB
-
 Decpac boarding ramp Queensland Rail SMU260 Platform 3 Roma St Railway Station IMGP1206.jpg 2,000 × 3,008; 2.69 MB
-
-
 Decpac boarding ramp Queensland Rail SMU260 Platform 3 Roma St Railway Station IMGP1208.jpg 3,008 × 2,000; 2.19 MB
-
 Decpac boarding ramp Queensland Rail SMU260 Platform 3 Roma St Railway Station IMGP1210.jpg 2,000 × 3,008; 2.86 MB
-
 Decpac boarding ramp Queensland Rail SMU260 Platform 3 Roma St Railway Station IMGP1211.jpg 2,000 × 3,008; 2.35 MB
-
 Decpac boarding ramp Queensland Rail SMU260 Platform 3 Roma St Railway Station IMGP1212.jpg 2,000 × 3,008; 2.48 MB
-
 Decpac boarding ramp Queensland Rail SMU260 Platform 3 Roma St Railway Station IMGP1218.jpg 3,008 × 2,000; 1.99 MB
-
 Decpac boarding ramp Queensland Rail SMU260 Platform 3 Roma St Railway Station IMGP1219.jpg 3,008 × 2,000; 2.05 MB
-
 Decpac boarding ramp Queensland Rail SMU260 Platform 3 Roma St Railway Station IMGP1220.jpg 3,008 × 2,000; 1.97 MB
-
 Decpac boarding ramp Queensland Rail SMU260 Platform 3 Roma St Railway Station IMGP1221.jpg 3,008 × 2,000; 1.97 MB
-
 Decpac boarding ramp Queensland Rail SMU260 Platform 3 Roma St Railway Station IMGP1262.jpg 3,008 × 2,000; 2.07 MB
-
 Decpac boarding ramp Queensland Rail SMU260 Platform 3 Roma St Railway Station IMGP1263.jpg 3,008 × 2,000; 1.96 MB
-
 Decpac boarding ramp Queensland Rail SMU260 Platform 3 Roma St Railway Station IMGP1264.jpg 3,008 × 2,000; 1.86 MB
-
 Decpac boarding ramp Queensland Rail SMU260 Platform 3 Roma St Railway Station IMGP1265.jpg 3,008 × 2,000; 1.86 MB
-
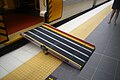
 Decpac ramp deployed over TGSIs at Geebung Railway Station 100 0324.jpg 2,080 × 1,368; 572 KB
-
 Directional TGSIs Kent St down to Platform 1, Dutton Park Railway Station IMGP8966.jpg 3,008 × 2,000; 2.81 MB
-
 Directional TGSIs Kent St down to Platform 1, Dutton Park Railway Station IMGP8967.jpg 3,008 × 2,000; 3.12 MB
-
 Discrete TGSIs Yerongpilly Railway Station DSCF7764.jpg 3,264 × 2,448; 3.03 MB
-
 Discrete TGSIs Yerongpilly Railway Station DSCF7765.jpg 3,264 × 2,448; 2.99 MB
-
 Drinking fountain in access path Platform 2 Geebung Rail Station P1180274.jpg 4,000 × 3,000; 10.2 MB
-
 EMU03SUN.jpg 5,184 × 3,456; 6.73 MB
-
 Exhibition Station Bowen Hills P1170701.jpg 4,000 × 3,000; 10.86 MB
-
 Exhibition train arrives Platform 6 Central Station Brisbane P1260832.jpg 4,000 × 3,000; 8.82 MB
-
 Fairfield Railway Station Equity St and Mildmay St Fairfield P1110608.jpg 4,000 × 3,000; 8.41 MB
-
 Fairfield Railway Station Equity St and Mildmay St Fairfield P1110609.jpg 4,000 × 3,000; 8.55 MB
-
 Fairfield Railway Station Equity St and Mildmay St Fairfield P1110703.jpg 4,000 × 3,000; 7.82 MB
-
 Ferny Grove train arrives at Platform 2 Fortitude Valley Station P1060850.jpg 4,000 × 3,000; 8.12 MB
-
 Ferny Grove train arrives Platform 2 Fortitude Valley Station P1110342.jpg 4,000 × 3,000; 8.21 MB
-
 Ferny Grove train departs Platform 2 Fortitude Valley Station Brisbane P1060890.jpg 4,000 × 3,000; 8.24 MB
-
 Film crew Platform 10 Roma Street Railway Station Roma St Brisbane P1040880.jpg 4,000 × 3,000; 9.03 MB
-
 Footpath treatment at Milton Railway Station Railway Tce Milton P1050322.jpg 4,000 × 3,000; 7.73 MB
-
 Geebung Rail Station at sunrise Geebung P1290795.jpg 4,000 × 3,000; 8.26 MB
-
 Geebung rail Station Platforms 1, 2 & 3 Geebung Station P1090916.jpg 4,000 × 3,000; 9.59 MB
-
 Geebung rail Station Platforms 1, 2 & 3 Geebung Station P1090917.jpg 4,000 × 3,000; 10.11 MB
-
 Geebung rail Station Platforms 1, 2 & 3 Geebung Station P1090918.jpg 4,000 × 3,000; 9.89 MB
-
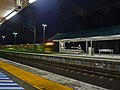
 Geebung Railway Station at night Railway Pde Geebung P1270075.jpg 4,000 × 3,000; 4.98 MB
-
 Geebung Railway Station at night Railway Pde Geebung P1270077.jpg 4,000 × 3,000; 5.32 MB
-
 Geebung Railway Station at night Railway Pde Geebung P1270078.jpg 4,000 × 3,000; 5.47 MB
-
 Geebung Railway Station at night Railway Pde Geebung P1270079.jpg 4,000 × 3,000; 5.67 MB
-
 Geebung Railway Station Platform 1 100 0320.jpg 2,080 × 1,368; 581 KB
-
 Geebung Railway Station Platform 2 100 0321.jpg 2,080 × 1,368; 601 KB
-
 Geebung Railway Station, Queensland, Aug 2012.JPG 4,288 × 3,216; 6.36 MB
-
 Geebung railway station, Queensland, March 2017, 03.jpg 4,032 × 3,024; 2.58 MB
-
 Geebung Railway Station, TGSIs, path of travel past Station office.jpg 2,080 × 1,544; 662 KB
-
 Guitarist through train window Platform 10 Roma St Rail Station Brisbane P1290854.jpg 3,000 × 4,000; 6.52 MB
-

-

-
 Ipswich train arrives Platform 3 Fortitude Valley Rail Station P1100608.jpg 4,000 × 3,000; 8.03 MB
-
 Ipswich train arrives Platform 3 Fortitude Valley Station Brisbane P1080229.jpg 4,000 × 3,000; 9.34 MB
-
 Ipswich Train arrives Platform 3 Fortitude Valley Station P1100413.jpg 4,000 × 3,000; 8.81 MB
-
 Ipswich Train departs Platform 3 Fortitude Valley Rail Station Brisbane P1070952.jpg 4,000 × 3,000; 7.23 MB
-
 Ipswich train departs Platform 3 Fortitude Valley Station P1090913.jpg 4,000 × 3,000; 8.75 MB
-
 Kuraby train arrives Platform 1 Fortitude Valley Rail Station P1100091.jpg 4,000 × 3,000; 8.79 MB
-
 Kuraby train arrives Platform 1 Fortitude Valley Rail Station P1100610.jpg 4,000 × 3,000; 9.47 MB
-
 Kuraby train arrives Platform 1 Fortitude Valley Station P1110434.jpg 4,000 × 3,000; 8 MB
-
 Kuraby train boarding Platform 1 Fortitude Valley Station P1090799.jpg 4,000 × 3,000; 8.6 MB
-
 Kuraby train boarding Platform 1 Fortitude Valley Station P1090800.jpg 4,000 × 3,000; 9.2 MB
-
 Kuraby train departs Platform 1 Fortitude Valley Rail Station Brisbane P1090530.jpg 4,000 × 3,000; 9.85 MB
-
 Kuraby train departs Platform 1 Fortitude Valley Rail Station P1100092.jpg 4,000 × 3,000; 10.49 MB
-
 New Generation Rollingstock 736 Sunshine Railway Station Bilsen Rd Geebung P1040861.jpg 4,000 × 3,000; 8.88 MB
-

-

-
-

-

-

-

-
 Nominated accessible boarding point and railcar door, Central Station Brisbane IMGP2015.jpg 3,008 × 2,000; 2.58 MB
-
 Nominated accessible boarding point, Central Station Brisbane IMGP2007.jpg 3,008 × 2,000; 2.69 MB
-
 Nominated accessible boarding point, Central Station Brisbane IMGP2008.jpg 3,008 × 2,000; 2.61 MB
-
 Nominated accessible boarding point, Central Station Brisbane IMGP2009.jpg 3,008 × 2,000; 3.09 MB
-
 Obstructed TGSIs at Mitchelton Railway Station 01.jpg 945 × 532; 360 KB
-
 Obstructed TGSIs at Mitchelton Railway Station 02.jpg 945 × 532; 397 KB
-
 Pavement advertising on concourse of Central Rail Station Brisbane P1190870.jpg 4,000 × 3,000; 9.3 MB
-
 Platform 2 Fairfield Railway Station Equity St and Mildmay St Fairfield P1110658.jpg 3,000 × 4,000; 7.45 MB
-
 Platform 2 Fairfield Railway Station Equity St and Mildmay St Fairfield P1110665.jpg 4,000 × 3,000; 8.18 MB
-
 Platform 2 Fairfield Railway Station Equity St and Mildmay St Fairfield P1110666.jpg 4,000 × 3,000; 8.01 MB
-

-

-
 Platform 3 Fairfield Railway Station Equity St and Mildmay St Fairfield P1110654.jpg 4,000 × 3,000; 7.76 MB
-
 Platform 9 from EMU Roma Street Railway Station Brisbane P1400349.jpg 4,000 × 3,000; 12.86 MB
-
 Platform edge TGSIs Geebung Railway Station P1340385.jpg 4,000 × 3,000; 12.78 MB
-
 Platform edge TGSIs Geebung Railway Station P1340386.jpg 3,000 × 4,000; 11.19 MB
-
 Platform edge TGSIs Roma Street Railway Station P1340384.jpg 4,000 × 3,000; 10.48 MB
-
 Platform edge warning sign Roma St Platform 3 IMGP2375.jpg 3,008 × 2,000; 2.63 MB
-

-

-

-

-

-

-

-

-
 Platform TGSIs, Platform 3 Geebung Railway Station IMGP1898.jpg 2,008 × 3,008; 2.97 MB
-
 Platform TGSIs, Platform 3 Geebung Railway Station IMGP1899.jpg 2,008 × 3,008; 3.02 MB
-
 Platform TGSIs, Platform 3 Geebung Railway Station IMGP1900.jpg 3,008 × 2,008; 3.24 MB
-
 Platform TGSIs, Platform 3 Geebung Railway Station IMGP1901.jpg 3,008 × 2,008; 4.89 MB
-
 Platform TGSIs, Platform 3 Geebung Railway Station IMGP1902.jpg 3,008 × 2,008; 3.21 MB
-
 Platform TGSIs, Platform 3 Geebung Railway Station IMGP1903.jpg 3,008 × 2,008; 4.26 MB
-
 Platform TGSIs, Platform 3 Geebung Railway Station IMGP1904.jpg 3,008 × 2,008; 3.68 MB
-

-
 QRail Citytrain Suburban Multiple Unit SMU-231 transits Geebung Rail Station P1300317.jpg 4,000 × 3,000; 9.88 MB
-
 QREMU03.jpg 5,184 × 3,456; 5.82 MB
-
 Queensland Rail Electric Multiple Unit EMU-83 Geebung Railway Station P1280934.jpg 4,000 × 3,000; 9.75 MB
-
-
 Queensland Rail Interurban Multiple Unit IMU-168 and rainbow Geebung Rail Station P1210047.jpg 4,000 × 3,000; 10.71 MB
-
 Queensland Rail Interurban Multiple Unit IMU-169 Geebung Railway Station Brisbane P1280520.jpg 4,000 × 3,000; 10.12 MB
-
 Queensland Rail Interurban Multiple Unit IMU-172 Geebung Rail Station P1280419.jpg 4,000 × 3,000; 10.66 MB
-
 Queensland Rail Suburban Multiple Unit SMU-210 Geebung Rail Station P1290454.jpg 4,000 × 3,000; 8.46 MB
-
 Queensland Rail Suburban Multiple Unit SMU-263 Geebung Rail Station P1290409.jpg 4,000 × 3,000; 10.41 MB


.jpg)
.jpg)


,_Brunswick_St_Station_Fortitude_Valley_DSCF2399.jpg)
,_Brunswick_St_Station_Fortitude_Valley_DSCF2402.jpg)


