Commons:Commonist
Commonist does not work at the moment!
See Commons:Upload tools for alternatives.


Commonist is a free Java program to upload large numbers of files to Wikimedia Commons, or other MediaWiki wiki installations.
Installation[edit]
Install Java 8 or later[edit]
In order to install Commonist you need Java 8 or a newer version:
- If you have not already installed Java, go to Java download page and download the version for your operating system.
- For Ubuntu Linux use the built-in Ubuntu Software Center app, search for Java, and install the OpenJDK Java 7 Runtime.
- Follow the steps of the Java installer.
Download and install the Commonist[edit]
Easiest way[edit]
Since the code isn't signed, you'll have to add an exception.
The most specific exception you could add is https://djini.de/commonist/ws/commonist.jnlp but you could also add just the site https://djini.de. See https://www.java.com/en/download/faq/exception_sitelist.xml for details.
This is the easiest way to access Commonist. If this method leads to a permission error while trying to upload images, please download and run Commonist as explained below.
Download & install[edit]
https://www.java.com provides a Java Runtime Environment (JRE) that should be installed on your computer. JRE allows the cross-platform development of Software for Linux, Windows, Mac. Commonist Java Byte Code is executed by the JRE on your operating system.
Windows
- Download the Commonist binary file
commonist-x.x.x-bin.zip - Extract the binary to your desktop. It will create a folder
commonist-x.x.x(x replaced by version number).[1] - Open Start >> run
- Type
cmd.exeand click OK - Type
chdir C:\- This will change the directory to
C:\
- This will change the directory to
- Find the location of the bin folder in your newly extracted folder.
- In the cmd window, change the directory to the folder where you extracted the bin folder. Type
cdfollowed by the location ofcommonist.baton your computer. - Type in
commonist.batand press enter.
![[1]](http://gyazo.com/f49ce8d8803ae6481c19237684939026.png)
or
- download to
C:\Windowsand extract there - draw
\bin\commonist.batwith right mouse button to desktop and there "linkage"
Unix-like, Linux and macOS
Download commonist-x.x.x.zip from djini.de/commonist/ to your /home folder. Unpack/extract it. It will create a new folder commonist-x.x.x (x replaced by version number).
Extracting it from File Roller will not create a folder. So first create a folder named "commonist" (or any name you like) inside your home folder. Then extract there the three folders included (bin, etc, lib). Go inside the bin folder, right click and change the properties of the commonist file to make it executable.
Start Commonist with bin/commonist (After chmod u+x bin/commonist this may do). Browse down to the /home/commonist-x.x.x/bin folder and double click on commonist.
Ubuntu Linux
To hook Commonist to a launcher icon on the top tool bar, firstly right click this icon, ![]() and save as an SVG (not PNG) to Desktop. Now control drag the
and save as an SVG (not PNG) to Desktop. Now control drag the commonist file found in /home/bin to the tool bar. In the pop-up dialogue, double click on the spring icon, you are asked to choose an icon, navigate to Desktop and select the ![]() hammer & sickle icon.
hammer & sickle icon.
Unity Desktop in Ubuntu 12.04
This desktop presents significant hurdles. First create two new folders on your Home page
commonistorsbin/commonist- usr- with sub folders share/icons
you will need these later
- Download the zip file, and extract it to commonist.
- Copy the
commonist.svg, and save it in share/icons - Go to commonist/bin, find the commonist file, right click- select permissions, tick on execute.
- From the Ubuntu Software Centre- Developer Tools- Java- install Open JDK Java 7 runtime
You now need to create the launcher. This has been disabled in 12.04. Two packets need to be installed using terminal.
In Terminal
sudo apt-get install gnome-panel
sudo apt-get install ubuntu-tweak
nautilus -q
- Ubuntu-tweak can be downloaded from the link. It hides in /downloads. It is a deb file. Right click, and open and install using Ubuntu Software Center.
Ubuntu Tweak is installed in Apps/Customization. Using Ubuntu-Tweak
- Select “Admins” tab, click on the “Scripts” from the Personal category
- You will see 2 columns Enabled Scripts and Disabled Scripts
- Find “Create Launcher…” in the Disabled Scripts column and drag it to Enabled Scripts column under nautilus-scripts
Back to the terminal
nautilus -q
Go to sbin/commonist. Right click anywhere on the folder and select Scripts -> Create Launcher… from the context menu
The Create Launcher dialog box pops up. Give a name, Commonist, Browse for the file (sbin/commonist), Add the icon (usr/share/icons) and comment if you need. The launcher is created in the sbin/commonist folder.
Drag the launcher to the Unity Launcher and you are done.
Mint 16 (Mate Desktop)
Firstly copy the Commonist.svg icon from this page to your Desktop as a SVG not a PNG. (Right click this icon, ![]() , save page)
, save page)
Create a /bin/commonist folder in home. Download anywhere commonist-x.x.x-bin.zip from djini.de/software/commonist. Extract it into /bin/commonist.
- Mint 16: Back to your desktop, right click, create launcher. In the Command dialog box browse through to ./bin/commonist/commonist-x.x.x/commonist, and click the icon to replace it with commonist.svg (where ever that was saved).
- Mint 16: But, with Mate, you can add this to the menu. right click Menu, Edit Menu. Then Application->Internet and Add item. In the Command dialog box type ./bin/commonist/commonist-x.x.x/commonist, and click the icon to replace it with commonist.svg (where ever that was saved). That bit was easy.
Usage[edit]
With the installed version of Commonist:
- After Commonist is installed and started a small hammer and sickle icon will pop up.
- On Windows:
- You will additionally see a terminal window which you can't close while the program is running.
- Another window will pop up. Click "continue".
- The Commonist program will appear.

When the Commonist program has started, note in the lower left is a tree view of your file system. Choose the folder which contains the images you want to upload. After you have selected this folder you will notice a small status message at bottom that Commonist is reading the content of the folder. Commonist will display on the right side a preview of each file.
- Promoting commonist
Please place {{Commonist}} in the description box before uploading. On the newly created file page, this template will be displayed:
Alternatively, for uploaders which prefer not to display the icon on their uploads, {{Commonist no icon}} may be used which functions in the same way:
These templates will not only help promote Commonist but it will place your files into a hidden category named Uploaded with Commonist.
Alternatively, when there's a second piece of information to be shown, one may add a bar like {{Inkscape and Commonist}} or {{Adobe and Commonist}}.
When using {{Image generation}}, the optional parameter $ adds the ![]() uploaded with Commonist
uploaded with Commonist
Users of Commonist may also place either {{User Commonist}} or {{User Commonist no icon}} on their user page.
General upload settings[edit]
In the upper left you see several fields of a mask below the label "general upload settings", on top of which you will find the fields necessary for the account you want to use for upload:
- user
- In the "user" field type in your user name on the wiki where you want to upload your images. Note that you enter it without the User: prefix.
- password
- Type in your password for this account there. It will be made invisible to the reader with asterisks (but will be transferred unencrypted over the internet.)
- wiki
- At the "wiki" drop down menu you can select the wiki where you want to upload the file. In case of Wikimedia Commons choose "commons". Note that within that wiki you need to own the very account you specified above. For a different wiki see Commonist on Other Wikis below.
- Further down you can enter general information that will be embedded in the image descriptions of all images you upload. Template:Information is being used for the structured image description (See Commons:First steps for details about the template; in other wikis beside Commons a free form description without the use of a template is being used by Commonist).
- description
- There you can enter the global description in normal wiki syntax which will be displayed at all image pages of images you upload within that session.
- source
- Use a statement such as “Own work.” (or, even better, the internationalized {{Own}} template) if you created that file yourself. Otherwise please supply a
- Link to a website
- Name of an institution
- Book source
- etc.
- Note that you can only enter one source for all images you upload at once.
- date
- Date of creation of the images you want to upload (or date of release if not available), preferably in ISO 8601 format, such as “
taken on 2006-01-08” for an image taken on 8 January 2006. - author
- Author(s) of the files. If you don’t know any individual, use the name of the institution(s) which released it. In case of self-made work, put your real name and your linked user name in parentheses, such as “
John Q. Public ({{u|JQPublic}})”. This will read as “John Q. Public (JQPublic)”. You might as well directly link your real name to the user name such as “[[User:JQPublic|John Q. Public]]”. - categories
- Enter one specific category there that fits to all of your images you want to upload without the namespace prefix or leave it blank in case you want to add the images afterwards to a gallery page.
To add several categories, in "categories" write: [[Category:VisualEditor-fr]]
[[Category:sambucus ebulus]].
That way you can enter categories containing commas. Be as specific as possible. Don’t add an image to an overcrowded root category like "Astronomy". In order to find a right category for your images the category tree will help you a lot.
- license
- In Wikimedia Commons it is essential that every file is correctly licensed. So choose out of the "license" the license you want to use for your images. For correct licensing please see Commons:Licensing. In case you did not find the right license leave it blank and have a look at Commons:Copyright tags but don't forget to add the correct license tag afterwards, otherwise your files will be deleted without further notice.
Image forms[edit]

On the top right you see two buttons labeled "deselect all" and "select all". Click these buttons to check/uncheck the upload status of all images in the current collection. The upload status is shown in the upload check box, next to each file thumbnail. You can manually check/uncheck single files, by clicking on the individual check boxes.
Click (single click) on the image thumbnail and the full size image will appear in a separate window. (See the screenshot.)
Next to each thumbnail, you will also find the following form fields:
- name
- In the "name" field, you type the destination file name of the image. On starting, the local file name will automatically be displayed here and this will be used by default. You are strongly advised to change the local file name into something meaningful. This edit is non destructive. The file name will not be changed on your hard disk, just the destination file name.
- Take special note of this, you cannot rename your file once it has been uploaded.
- Non-descriptive file names - e. g. names like “DSC123456.jpg”, render them a lot harder to find and use. Also it is very likely that another user will try to upload a file with the very same name but with different content, and that file will be suggested for deletion.
- description
- In the "description" field, you enter the description of that file. Use normal wiki syntax. This will be displayed on the image page; it will be appended to the general description. Please give a good description of the content of each file. What do you see, hear, or otherwise perceive? If it's an item of artwork, please provide a brief historical background. In case of scientific data, a brief scientific abstract of the file. Descriptions can be in any language, but it is always a good idea to include an English description as well. If you speak multiple languages, consider adding the description in each of them. (Please use the language templates as described on Commons:Multilinguality, like in this code example for English: "{{en|Example description}}").
- permission
- Will be filled into the corresponding field in the Template:Information
- coordinates
- Specify geocoordinates here as comma-separated decimal values to put a Template:Location_dec template on the image description page. Otherwise (i.e. if no two comma separated values are found) the string will be transmitted without changes; this is usefull if you would like to give your own formated geolocation string.
- categories
- In the "categories" field, you specify additional categories (without the category namespace prefix) separated by a vertical bar or pipe |. Please also try to be as specific as possible. Try to avoid using more than two topic categories per image, they can be added later.
Proxy[edit]
Proxy settings are read from Java's system properties http.proxyHost, http.proxyPort and http.nonProxyHosts. If these are not set, the environment variable http_proxy is used.
Upload[edit]
After you have finished your preparations for the upload click on the "upload" button in the lower right corner of the main window. There is a status bar at the bottom line explaining what Commonist is doing. You can cancel the upload at any time by clicking on "abort" next to the "upload" button. If everything works well, it will display first the login procedure and then the upload status of the single files there. If something went wrong please check if you typed in the correct user name, password and wiki.
Every uploaded file will be added automatically to your watchlist, so that you can always track the changes by others to your files. Every uploaded file also will be added to a personal user gallery located at User:YOUR_USERNAME/gallery, grouped by upload jobs and upload date, with the image description as description of the thumbnail, so that you will automatically have a pleasant overview of all of your uploads.
Copy pasting[edit]
Mouse right click paste may not work. In Windows use Ctrl+v for paste, Ctrl+c for copy, Ctrl+x for cut, and Delete key for delete. Mouse drag highlighting should work as well as mouse copy from other applications.
Commonist on other wikis[edit]
Requirements:
- Only wikis having file upload via
api.phpenabled are supported. - The wiki must be running MediaWiki 1.16.0 and above (check your version at Special:Version).
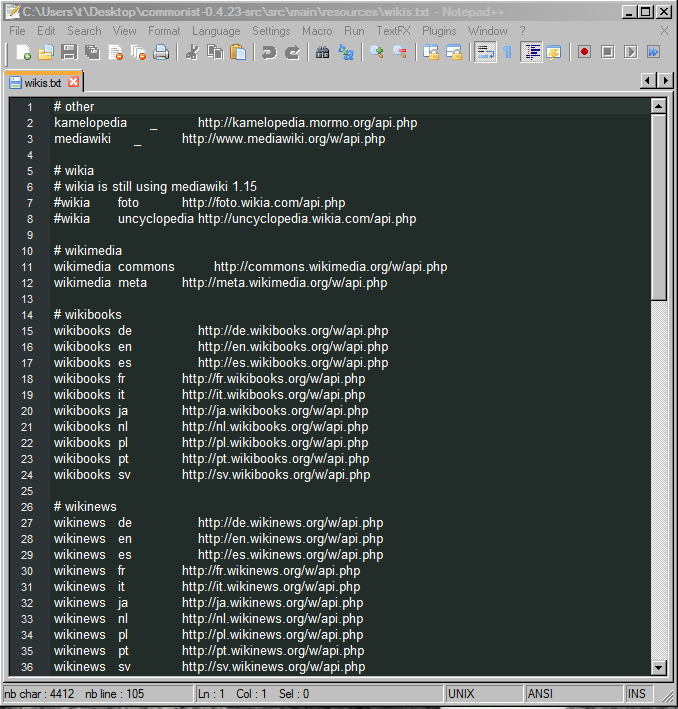
Find the wikis.txt file. The wikis.txt file is also found in the bin folder here:
- C:\Users\t\Desktop\commonist-0.5.0-src\src\main\resources
A copy of wikis.txt may also be found also in ~/.commonist/wikis.txt
In this wikis.txt file add a line. This line consists of three fields:
- Name of the wiki,
- language code or "_" and
- the url of its api.php.
Kamelopedia, for example, looks like this:
kamelopedia _ http://kamelopedia.mormo.org/api.php
Click here for a screenshot of wikis.txt as seen on text editor Notepad++. Your format should look like lines 2 and 3.
Geocoding[edit]
Geocoding is attaching geographic location information to files uploaded with commonist. If an image includes geocoding in the embedded EXIF data, commonist extracts this data and places a {{Location dec}} template on the file (image) description page.
The best way to geocode your images is with a GPS receiver integrated in your camera or synchronised with a GPS logger on your computer. For those who don't have a GPS but know the location of the camera when the photo was taken there are two ways to geocode your images:
Option 1: Panorado Flyer[edit]
This option is for windows users with Google Earth and Panorado Flyer installed only. It's advantage is that you can easily set the camera heading. Search the location in Google Earth and place it in the middle of the screen. Rotate the satellite map so that the viewing direction of the image is equal to the upward direction of the screen. Then right click on your image in Explorer, Panorado Flyer->Get location from Google Earth, OK. Start Commonist and the coordinates text field will be filled automatically.
Option 2: Google Maps[edit]
An other way to save time is adding a special bookmark to the browser, and locating the position of the camera on a maps.google.com map. When the special bookmark is used, the browser generates geocode tag. This works on Linux and other operating systems.
- First create a bookmark (on Firefox: Bookmarks>Organise Bookmarks>New Bookmark) with the location as:
javascript:void(prompt('',"{{location dec|" + gApplication.getMap().getCenter().lat().toFixed(4) + "|" + gApplication.getMap().getCenter().lng().toFixed(4) + "}}"));
For each image:
- Open Commonist, and select the target image.
- Load maps.google.com in the browser.
- Search for the correct location.
- Click on "Satellite" if it helps to find the location more easily, and zoom in.
- Double Click on the exact location the media was recorded to zoom and center the map.
- Click on your bookmark and you'll get a prompt with the geocode tag to add to the image.
- Press Ctrl-C to copy this tag.
- Switch to Commonist, click on the description field of the target image, press Ctrl-V to paste the tag.
Bugs and feedback[edit]
For sending feedback to the program author please choose one:
- GitHub Issue Tracker (preferred)
- talk page
License and Source[edit]
Commonist is licensed under the GNU General Public License (Wikipedia article).
The source code is available through GitHub.
See also[edit]
- Extension:UploadLocal
- Commons:VicuñaUploader – Vicuña uploader, another Java batch uploader
- Image File Migrator – a Python tool that can download files from one wiki and upload them to another.
- User:Nichalp/Upload script – a Perl script to batch upload images by reading a CSV file.