Category:Palliser shot and shell
Jump to navigation
Jump to search
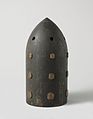
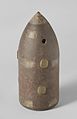
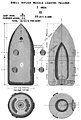
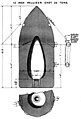
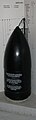
English: Palliser shot and shell were early British armour-piercing artillery projectiles, in use 1860s - 1900s.
early British armour-piercing artillery projectile  | |||||
| Upload media | |||||
| Instance of |
| ||||
|---|---|---|---|---|---|
| Subclass of | |||||
| Discoverer or inventor |
| ||||
| |||||
Media in category "Palliser shot and shell"
The following 24 files are in this category, out of 24 total.
-
 18 cm Segmentgranaat, NG-MC-1295.jpg 5,730 × 2,976; 1.57 MB
-
 23 cm Glasharde granaat, NG-MC-1287.jpg 4,704 × 5,907; 1.41 MB
-
 23 cm Glasharde granaat, NG-MC-1291.jpg 4,237 × 5,624; 1.37 MB
-
 23 cm Stalen granaat, NG-MC-1292.jpg 5,652 × 3,024; 1.38 MB
-
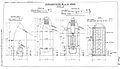 BL 4 inch gun projectiles diagrams 1890.jpg 1,600 × 922; 185 KB
-
 BL 6 inch Mk VIII Palliser shot diagram.jpg 785 × 900; 78 KB
-
 BL 8 inch Mark VII gun Palliser shot Mark III diagram.jpg 839 × 1,400; 103 KB
-
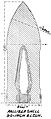 BL 9.2 inch Palliser shell diagram.jpg 400 × 936; 80 KB
-
 BL 12 inch Palliser shot Mk II diagram.jpg 521 × 900; 120 KB
-
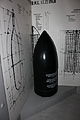 Model of the shell for the 100 tonne gun, Gibraltar.JPG 3,456 × 5,184; 6 MB
-
 NG-MC-1289.jpg 4,496 × 5,776; 1.38 MB
-
 NG-MC-1296.jpg 3,520 × 5,444; 1.33 MB
-
 RML 6.6 inch Palliser shot diagram.jpg 750 × 986; 154 KB
-
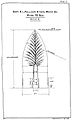
 RML 7 inch Palliser shell Mk III diagram.jpg 1,004 × 1,488; 107 KB
-
 RML 7 inch Palliser shot Mk VI diagram.jpg 1,023 × 1,466; 106 KB
-
 RML 7-inch shells at Halifax Citadel 2005.jpg 2,272 × 1,704; 2.81 MB
-

-
 RML 10 inch Palliser studless shell Mk II diagram.jpg 1,032 × 1,798; 283 KB
-
 RML 12 inch 25 ton Palliser shot diagram.jpg 679 × 1,000; 139 KB
-
 RML 12 inch 35 ton gun studded projectiles diagrams.jpg 1,600 × 978; 217 KB
-
 RML 12 inch 35 ton gun studless projectiles diagrams.jpg 1,600 × 994; 246 KB
-
 RML 12.5in Studded Palliser Shell Mk III with Attached Gas-Check Mk II.JPG 943 × 1,213; 249 KB
-
 RML 12.5in Studless Palliser Shell Mk I with Automatic Gas-Check.JPG 951 × 1,185; 317 KB
-
 Rockbuster-projectile-17.72-inch.jpg 480 × 1,600; 317 KB


