Category:People at train stations in Australia
Jump to navigation
Jump to search
Subcategories
This category has the following 3 subcategories, out of 3 total.
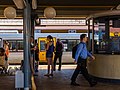
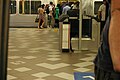
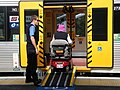
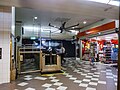
Media in category "People at train stations in Australia"
The following 200 files are in this category, out of 238 total.
(previous page) (next page)-
 Accessway beteween TGSIs and structure, Central Station, Brisbane IMGP2011.jpg 3,008 × 2,000; 2.67 MB
-
 Airport Train arrives Platform 1 Fortitude Valley Station Brisbane P1090466.jpg 4,000 × 3,000; 8.19 MB
-
 Airport train arrives Platform 2 Fortitude Valley Rail Station P1100606.jpg 4,000 × 3,000; 9.7 MB
-
 Anzac Troop Train arrival Platform 10 Roma Street railway station Roma St Brisbane P1400561.jpg 4,000 × 3,000; 10.11 MB
-

-

-

-

-
 Assisted boarding point and sign Platform 6 Central Rail Station Brisbane P1100044.jpg 3,000 × 4,000; 12.18 MB
-
 Assisted boarding point and sign Platform 6 Central Rail Station Brisbane P1100045.jpg 3,000 × 4,000; 12.04 MB
-
 Assisted boarding point from QR SMU260 Platform 6 Central Rail Station Brisbane P1170647.jpg 4,000 × 3,000; 9.17 MB
-
 Assisted boarding point platform 9 Roma Street Station Brisbane P1320688.jpg 4,000 × 3,000; 11.73 MB
-
 Boarding assistance Platform 9 Roma Street Railway Station Roma St Brisbane P1040881.jpg 4,000 × 3,000; 8.38 MB
-
 Boarding assistance sign Platform 5&6 Central Station Brisbane P1270993.jpg 3,000 × 4,000; 7.51 MB
-
 Bowen Hills train departs Platform 6 Central Rail Station Brisbane P1200632.jpg 4,000 × 3,000; 7.92 MB
-
 Bowen Hills train standing at Platform 6 Central Rail Station Brisbane P1200631.jpg 4,000 × 3,000; 7.57 MB
-
 Brunswick St Station Platform 3, IMU160 carriage doors open, Fortitude Valley DSCF2739.jpg 3,264 × 2,448; 3.06 MB
-
 Caboolture train arrives Platform 4 Fortitude Valley Station Brisbane P1080462.jpg 4,000 × 3,000; 8.29 MB
-
 Caboolture train arrives Platform 4 Fortitude Valley Station Brisbane P1090279.jpg 4,000 × 3,000; 7.91 MB
-
 Caboolture train arrives Platform 4 Fortitude Valley Station P1100016.jpg 4,000 × 3,000; 9.52 MB
-
 Caboolture train arrives Platform 4 Fortitude Valley Station P1100038.jpg 4,000 × 3,000; 8.44 MB
-
 Caboolture train arrives Platform 4 Fortitude Valley Station P1110312.jpg 4,000 × 3,000; 8.7 MB
-
 Caboolture train arrives Platform 6 Central Rail Station Brisbane P1100048.jpg 4,000 × 3,000; 6.97 MB
-
 Caboolture train arrives Platform 6 Central Rail Station Brisbane P1100049.jpg 4,000 × 3,000; 7.43 MB
-
 Caboolture train arrives Platform 6 Central Rail Station Brisbane P1100506.jpg 4,000 × 3,000; 8.28 MB
-
 Caboolture train arrives Platform 6 Central Rail Station Brisbane P1190871.jpg 4,000 × 3,000; 7.53 MB
-
 Caboolture train arrives Platform 6 Central Rail Station Brisbane P1190872.jpg 4,000 × 3,000; 7.93 MB
-
 Caboolture train arrives Platform 6 Central Rail Station P1100229.jpg 4,000 × 3,000; 7.21 MB
-
 Caboolture train arrives Platform 6 Central Rail Station P1110538.jpg 4,000 × 3,000; 8.48 MB
-
 Caboolture train arrives Platform 6 Central Rail Station P1110539.jpg 4,000 × 3,000; 7.92 MB
-
 Caboolture train arrives Platform 6 Central Station Brisbane P1110840.jpg 4,000 × 3,000; 8.45 MB
-
 Caboolture train arrives Platform 6 Central Station Brisbane P1110841.jpg 4,000 × 3,000; 8.49 MB
-
 Caboolture train arrives Platform 6 Central Station Brisbane P1120004.jpg 3,000 × 4,000; 9.59 MB
-
 Caboolture train departs Platform 4 Fortitude Valley Station Brisbane P1090280.jpg 4,000 × 3,000; 6.9 MB
-
 Caboolture train departs Platform 4 Fortitude Valley Station P1100039.jpg 4,000 × 3,000; 8.77 MB
-
 Caboolture train departs Platform 6 Central Rail Station P1100231.jpg 4,000 × 3,000; 8.14 MB
-
 Caboolture train departs Platform 6 Central Rail Station P1100501.jpg 4,000 × 3,000; 8.99 MB
-
 Caboolture train departs Platform 6 Central Rail Station P1110507.jpg 4,000 × 3,000; 8.36 MB
-
 Caboolture Train departs Platform 6 Central Station P1100415.jpg 4,000 × 3,000; 9.3 MB
-
 Carriage to platform gap Platform 9 Roma Street railway station Brisbane P1400451.jpg 4,000 × 3,000; 11.01 MB
-
 Central Station escalator From Anzac Square Building Ann St Brisbane P1070864.jpg 4,000 × 3,000; 8.37 MB
-
 Central Station escalator From Anzac Square Building Ann St Brisbane P1070865.jpg 4,000 × 3,000; 8.3 MB
-
 Central Station escalator From Anzac Square Building Ann St Brisbane P1070866.jpg 4,000 × 3,000; 8.17 MB
-
 Central Station escalator From Anzac Square Building Ann St Brisbane P1070867.jpg 4,000 × 3,000; 8.48 MB
-
 Central Station escalator From Anzac Square Building Ann St Brisbane P1070868.jpg 4,000 × 3,000; 8.5 MB
-
 Central Station escalator From Anzac Square Building Ann St Brisbane P1100549.jpg 4,000 × 3,000; 9.34 MB
-
 Central Station escalator From Anzac Square Building Ann St Brisbane P1100551.jpg 4,000 × 3,000; 9.11 MB
-
 Central Station Platforms 3 and 4 Central Rail Station Brisbane P1110241.jpg 4,000 × 3,000; 11.12 MB
-
 Central Station Platforms 3 and 4 Central Rail Station Brisbane P1110242.jpg 4,000 × 3,000; 10.61 MB
-
 Central Station Platforms 3 and 4 Central Rail Station Brisbane P1110243.jpg 4,000 × 3,000; 10.96 MB
-
 Central Station Platforms 3 and 4 Central Rail Station Brisbane P1110244.jpg 4,000 × 3,000; 10.89 MB
-
 Central Station Platforms 5 and 6 Central Rail Station Brisbane IMGP4743.jpg 3,008 × 2,008; 4.39 MB
-
 Checking the NGR Sunshine Railway Station Bilsen Rd Geebung P1050101.jpg 4,000 × 3,000; 7.89 MB
-
 Checking the NGR Sunshine Railway Station Bilsen Rd Geebung P1050102.jpg 4,000 × 3,000; 8.85 MB
-
 City of Maryborough and SMS text reader Roma St Station Brisbane P1290107.jpg 3,000 × 4,000; 10.59 MB
-
 Cleveland train boarding Platform 3 Fortitude Valley Station P1090963.jpg 4,000 × 3,000; 8.11 MB
-
 Cleveland train departs Platform 3 Fortitude Valley Station P1090964.jpg 4,000 × 3,000; 9.28 MB
-
 Coloured stockings Geebung Railway Station P1340160.jpg 3,000 × 4,000; 10.37 MB
-
 Coloured stockings Geebung Railway Station P1340161.jpg 3,000 × 4,000; 10.14 MB
-
 Coloured stockings Geebung Railway Station P1340162.jpg 4,000 × 3,000; 10.07 MB
-

-

-
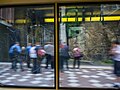
 Commuters and grafittied train Platform 3 Central Rail Station Brisbane P1210847.jpg 4,000 × 3,000; 10.43 MB
-
 Commuters and grafittied train Platform 3 Central Rail Station Brisbane P1210848.jpg 4,000 × 3,000; 11.67 MB
-

-

-

-
 Commuters boarding Platform 4 Fortitude Valley Railway Station Brisbane P1410640.jpg 4,000 × 3,000; 8.29 MB
-
 Commuters boarding Platform 4 Fortitude Valley Railway Station Brisbane P1410640a.jpg 5,000 × 3,750; 12.36 MB
-
 Commuters Platform 6 Central Rail Station Brisbane P1210846.jpg 4,000 × 3,000; 8.91 MB
-
 Commuters Platform 9 Roma St Railway Station Brisbane P1410120.jpg 4,000 × 3,000; 8.3 MB
-
 Commuters Platform 9 Roma St Railway Station Brisbane P1410121.jpg 4,000 × 3,000; 8.58 MB
-
 Commuters Platform 9 Roma St Railway Station Brisbane P1410130.jpg 4,000 × 3,000; 9.39 MB
-
 Commuters Platform 9 Roma Street Railway Station Brisbane P1400744.jpg 4,000 × 3,000; 7.93 MB
-
 Commuters Platform 9 Roma Street Railway Station Brisbane P1400745.jpg 4,000 × 3,000; 8.06 MB
-
 Commuters Platform 9 Roma Street Railway Station Brisbane P1400746.jpg 4,000 × 3,000; 8.3 MB
-
 Commuters Platform 9 Roma Street Railway Station Brisbane P1400747.jpg 4,000 × 3,000; 8.69 MB
-
 Commuters Platform 9 Roma Street Railway Station Brisbane P1410634.jpg 4,000 × 3,000; 9.57 MB
-
 Commuters Platform 9 Roma Street Railway Station Brisbane P1410649.jpg 4,000 × 3,000; 9.34 MB
-
 Commuters Platform 9 Roma Street Railway Station Roma St Brisbane P1400311.jpg 4,000 × 3,000; 8.51 MB
-
 Commuters Platform 9 Roma Street Railway Station Roma St Brisbane P1400312.jpg 4,000 × 3,000; 9.87 MB
-
 Commuters read smartphones Platform 9 Roma Street Railway Station Brisbane P1360446.jpg 4,000 × 3,000; 10.64 MB
-
 Commuters wait on Platforms 8&9 Roma Street Rail Station Brisbane P1290350.jpg 3,000 × 4,000; 10.96 MB
-
 Commuters wait on Platforms 8&9 Roma Street Rail Station Brisbane P1290401.jpg 4,000 × 3,000; 9.87 MB
-
 Commuters wait on Platforms 8&9 Roma Street Rail Station Brisbane P1290402.jpg 4,000 × 3,000; 11.4 MB
-
 Commuters wait on Platforms 8&9 Roma Street Rail Station Brisbane P1290435.jpg 4,000 × 3,000; 10.79 MB
-
 Commuters wait on Platforms 8&9 Roma Street Rail Station Brisbane P1290436.jpg 4,000 × 3,000; 11.04 MB
-
 Commuters wait on Platforms 8&9 Roma Street Rail Station Brisbane P1290450.jpg 4,000 × 3,000; 9.4 MB
-
 Commuters wait on Platforms 8&9 Roma Street Rail Station Brisbane P1290519.jpg 4,000 × 3,000; 12.97 MB
-
 Commuters wait on Platforms 8&9 Roma Street Rail Station Brisbane P1290520.jpg 4,000 × 3,000; 10.21 MB
-
 Commuters wait on Platforms 8&9 Roma Street Rail Station Brisbane P1290521.jpg 4,000 × 3,000; 9.87 MB
-
 Commuters wait on Platforms 8&9 Roma Street Rail Station Brisbane P1290522.jpg 4,000 × 3,000; 9.7 MB
-
 Commuters with smartphones Platforms 8&9 Roma Street Railway Station Brisbane P1360425.jpg 4,000 × 3,000; 10.81 MB
-

-

-

-

-
 Decpac ramp Central Station Brisbane IMGP1281.jpg 3,008 × 2,000; 3.05 MB
-
 Decpac ramp Central Station Brisbane IMGP1282.jpg 3,008 × 2,000; 2.9 MB
-
 Decpac ramp Central Station Brisbane IMGP1283.jpg 2,000 × 3,008; 4.01 MB
-

-

-
-

-
 Exhibition train arrives Platform 6 Central Station Brisbane P1260832.jpg 4,000 × 3,000; 8.82 MB
-
 Fare Gates Platforms 5 & 6 Central Railway Station Brisbane P1350559.jpg 4,000 × 3,000; 7.61 MB
-
 Fare Gates Platforms 5 & 6 Central Railway Station Brisbane P1350565.jpg 4,000 × 3,000; 9.52 MB
-
 Ferny Grove train arrives Platform 2 Fortitude Valley Station P1110342.jpg 4,000 × 3,000; 8.21 MB
-
 Film crew Platform 10 Roma Street Railway Station Roma St Brisbane P1040880.jpg 4,000 × 3,000; 9.03 MB
-
 Fortitude Valley rail station concourse Valley Centre Plaza P1110432.jpg 4,000 × 3,000; 8.57 MB
-
 Fortitude Valley rail station concourse Valley Centre Plaza P1110433.jpg 4,000 × 3,000; 8.6 MB
-
 Fortitude Valley Railway Station entrance IMGP1874.jpg 3,008 × 2,008; 4.02 MB
-
 Fortitude Valley Railway Station entrance IMGP1875.jpg 3,008 × 2,008; 3.2 MB
-
 Fortitude Valley Railway Station entrance IMGP1876.jpg 3,008 × 2,008; 4.49 MB
-
 Fortitude Valley Railway Station entrance IMGP1877.jpg 3,008 × 2,008; 3.17 MB
-
 Fortitude Valley Railway Station entrance IMGP1878.jpg 3,008 × 2,008; 4.31 MB
-
 Fortitude Valley Railway Station entrance IMGP1879.jpg 3,008 × 2,008; 6.67 MB
-
 Fortitude Valley Station entrance and barrier gates, DSCF4108.jpg 3,264 × 2,448; 3.5 MB
-
-

-

-

-

-

-

-
 Gold Coast train arrives Platform 3 Fortitude Valley Station P1090965.jpg 4,000 × 3,000; 9.06 MB
-
 Gold Coast train departs Platform 3 Fortitude Valley Station P1090966.jpg 4,000 × 3,000; 9.56 MB
-
 Guitarist through train window Platform 10 Roma St Rail Station Brisbane P1290854.jpg 3,000 × 4,000; 6.52 MB
-
 ICE train arrives Platform 3 Fortitude Valley Station Brisbane P1090281.jpg 3,000 × 4,000; 8.52 MB
-
 ICE train departing Platform 3 Fortitude Valley Station Brisbane P1070920.jpg 4,000 × 3,000; 8.5 MB
-
 Ipswich tain arrives Platform 5 Central Rail Station Brisbane P1090531.jpg 4,000 × 3,000; 8.68 MB
-
 Ipswich train arrives Central Station Platform 5 Central Station Brisbane P1070701.jpg 4,000 × 3,000; 9.2 MB
-
 Ipswich train arrives Platform 1 Geebung Rail Station P1140211.jpg 4,000 × 3,000; 6.84 MB
-
 Ipswich train arrives Platform 1 Geebung Rail Station P1140276.jpg 4,000 × 3,000; 6.36 MB
-
 Ipswich train arrives Platform 3 Fortitude Valley Rail Station P1100608.jpg 4,000 × 3,000; 8.03 MB
-
 Ipswich train arrives Platform 3 Fortitude Valley Station Brisbane P1080229.jpg 4,000 × 3,000; 9.34 MB
-
 Ipswich Train arrives Platform 3 Fortitude Valley Station P1100413.jpg 4,000 × 3,000; 8.81 MB
-
 Ipswich train arrives Platform 5 Central rail Station Brisbane P1090688.jpg 4,000 × 3,000; 8.85 MB
-
 Ipswich train arrives Platform 5 Central Rail Station P1100022.jpg 4,000 × 3,000; 9.72 MB
-
 Ipswich train arrives Platform 5 Central Rail Station P1100240.jpg 4,000 × 3,000; 8.68 MB
-
 Ipswich train arrives Platform 5 Central Rail Station P1100473.jpg 4,000 × 3,000; 8.22 MB
-
 Ipswich train arrives Platform 5 Central Rail Station P1100611.jpg 4,000 × 3,000; 10.5 MB
-
 Ipswich train arrives Platform 5 Central Rail Station P1110090.jpg 3,000 × 4,000; 10 MB
-
 Ipswich train arrives Platform 5 Central Rail Station P1110313.jpg 4,000 × 3,000; 9.99 MB
-
 Ipswich train arrives Platform 5 Central Station Brisbane P1070643.jpg 4,000 × 3,000; 8.58 MB
-
 Ipswich Train arrives Platform 5 Central Station Brisbane P1070954.jpg 4,000 × 3,000; 10.04 MB
-
 Ipswich train arrives Platform 5 Central Station Brisbane P1080367.jpg 4,000 × 3,000; 7.58 MB
-
 Ipswich train arrives Platform 5 Central Station Brisbane P1080464.jpg 3,000 × 4,000; 7.17 MB
-
 Ipswich train arrives Platform 5 Central Station Brisbane P1090209.jpg 4,000 × 3,000; 8.29 MB
-
 Ipswich train arrives Platform 5 Central Station Brisbane P1090286.jpg 4,000 × 3,000; 8.55 MB
-
 Ipswich train arrives Platform 5 Central Station Brisbane P1090796.jpg 4,000 × 3,000; 9.22 MB
-
 Ipswich train arrives Platform 5 Central Station Brisbane P1090858.jpg 4,000 × 3,000; 9 MB
-
 Ipswich train arrives Platform 5 Central Station P1090802.jpg 4,000 × 3,000; 8.07 MB
-
 Ipswich Train arrives Platform 5 Central Station P1100414.jpg 4,000 × 3,000; 8.62 MB
-
 Ipswich train boarding on platform 1 Geebung Rail Station P1140184.jpg 4,000 × 3,000; 8.29 MB
-
 Ipswich train boarding on platform 1 Geebung Rail Station P1140185.jpg 4,000 × 3,000; 8.37 MB
-
 Ipswich train boarding on platform 1 Geebung Rail Station P1140186.jpg 4,000 × 3,000; 8.93 MB
-
 Ipswich train boarding on platform 1 Geebung Rail Station P1140194.jpg 4,000 × 3,000; 8.31 MB
-
 Ipswich train boarding on platform 1 Geebung Rail Station P1140195.jpg 4,000 × 3,000; 7.58 MB
-
 Ipswich train boarding on platform 1 Geebung Rail Station P1140196.jpg 4,000 × 3,000; 7.84 MB
-
 Ipswich train boards Platform 1 Geebung Rail Station P1140212.jpg 4,000 × 3,000; 7.03 MB
-
 Ipswich train boards Platform 1 Geebung Rail Station P1140277.jpg 4,000 × 3,000; 6.77 MB
-
 Ipswich train departs platform 1 Geebung Rail Station P1140197.jpg 4,000 × 3,000; 1.59 MB
-
 Ipswich train departs platform 1 Geebung Rail Station P1140198.jpg 4,000 × 3,000; 8.2 MB
-
 Ipswich train departs Platform 1 Geebung Rail Station P1140213.jpg 4,000 × 3,000; 7.04 MB
-
 Ipswich train departs Platform 1 Geebung Rail Station P1140214.jpg 4,000 × 3,000; 7.19 MB
-
 Ipswich train departs Platform 1 Geebung Rail Station P1140278.jpg 4,000 × 3,000; 7.06 MB
-
 Ipswich train departs Platform 1 Geebung Rail Station P1140279.jpg 4,000 × 3,000; 7.02 MB
-
 Ipswich train departs Platform 3 Fortitude Valley Station P1110102.jpg 4,000 × 3,000; 8.94 MB
-
 Kuraby train arrives Platform 1 Fortitude Valley Rail Station P1100091.jpg 4,000 × 3,000; 8.79 MB
-
 Kuraby train arrives Platform 1 Fortitude Valley Rail Station P1100607.jpg 4,000 × 3,000; 9.72 MB
-
 Kuraby train arrives Platform 1 Fortitude Valley Rail Station P1100610.jpg 4,000 × 3,000; 9.47 MB
-
 Kuraby Train arrives Platform 1 Fortitude Valley Station Brisbane P1090467.jpg 4,000 × 3,000; 9.31 MB
-
 Kuraby train arrives Platform 1 Fortitude Valley Station Brisbane P1090524.jpg 4,000 × 3,000; 10.18 MB
-
 Kuraby train arrives Platform 1 Fortitude Valley Station Brisbane P1090795.jpg 4,000 × 3,000; 8.97 MB
-
 Kuraby train arrives Platform 1 Fortitude Valley Station P1110434.jpg 4,000 × 3,000; 8 MB
-
 Kuraby train boarding Platform 1 Fortitude Valley Station P1090799.jpg 4,000 × 3,000; 8.6 MB
-
 Kuraby train boarding Platform 1 Fortitude Valley Station P1090800.jpg 4,000 × 3,000; 9.2 MB
-
 Kuraby train departs Platform 1 Fortitude Valley Rail Station Brisbane P1090530.jpg 4,000 × 3,000; 9.85 MB
-
 Kuraby train departs Platform 1 Fortitude Valley Rail Station Brisbane P1090687.jpg 4,000 × 3,000; 9.52 MB
-
 Kuraby train departs Platform 1 Fortitude Valley Rail Station P1100092.jpg 4,000 × 3,000; 10.49 MB
-
 Kuraby Train departs Platform 1 Fortitude Valley Station Brisbane P1090467.jpg 4,000 × 3,000; 3.16 MB
-
 Kuraby Train departs Platform 1 Fortitude Valley Station Brisbane P1090468.jpg 4,000 × 3,000; 10.92 MB
-
 Kuraby train departs Platform 1 Fortitude Valley Station Brisbane P1090525.jpg 4,000 × 3,000; 10.9 MB
-
 Nominated accessible boarding point and railcar door, Central Station Brisbane IMGP2015.jpg 3,008 × 2,000; 2.58 MB
-
 Nominated accessible boarding point, Central Station Brisbane IMGP2009.jpg 3,008 × 2,000; 3.09 MB
-
 Non passenger service arrives Platform 4 Fortitude Valley Station P1100017.jpg 4,000 × 3,000; 9.41 MB
-
 Non passenger service arrives Platform 4 Fortitude Valley Station P1100018.jpg 4,000 × 3,000; 9.84 MB
-
 Non passenger service departs Platform 4 Fortitude Valley Station P1100019.jpg 4,000 × 3,000; 9.57 MB
-
 Non passenger service departs Platform 4 Fortitude Valley Station P1100020.jpg 4,000 × 3,000; 9.33 MB
-
 Passenger in silhouette Platform 8&9 stair Roma St Rail Station Brisbane P1290832.jpg 4,000 × 3,000; 10.42 MB
-
 Passengers in silhouette platform 8 Roma St Station Brisbane P1290116.jpg 4,000 × 3,000; 8.85 MB
-
 Platform 10 from EMU Roma Street Railway Station Brisbane P1400348.jpg 4,000 × 3,000; 11.35 MB
-
 Platform 9 from EMU Roma Street Railway Station Brisbane P1400349.jpg 4,000 × 3,000; 12.86 MB
-

-

-
 Roma St Station Entrance Roma St Brisbane P1250984.jpg 4,000 × 3,000; 9.77 MB
-
 Roma Street Rail Station Platforms 8 and 7 Roma St Station Brisbane P1280920.jpg 4,000 × 3,000; 7.81 MB
-
 Sandgate Rail station entrance Rainbow St Sandgate IMGP1900.jpg 4,288 × 2,848; 10.84 MB
-
 Sandgate Rail station entrance Rainbow St Sandgate IMGP1901.jpg 4,288 × 2,848; 10.62 MB


