Category:SBB Historic - Photographische Ansichten der Gotthardbahn
Jump to navigation
Jump to search
Fotos der Firma Adolphe Braun et Cie.
Media in category "SBB Historic - Photographische Ansichten der Gotthardbahn"
The following 121 files are in this category, out of 121 total.
-
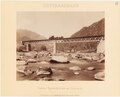
 Ile-SBB Historic - F 111 00003 049 - Rheussthal bei Wassen thalabwaerts.tiff 9,161 × 7,347; 192.56 MB
-
 SBB Historic - F 111 00003 001 - Luzern.tiff 9,117 × 7,279; 189.87 MB
-
 SBB Historic - F 111 00003 002 - Tunnelportal Seite Immensee Rindelfluh-Tunneleingang.jpg 7,170 × 8,952; 12.46 MB
-
 SBB Historic - F 111 00003 003 - Rueckblick von der Rindelfluh auf den Zugersee.tiff 9,157 × 7,341; 192.32 MB
-
 SBB Historic - F 111 00003 004 - Bahngebiet bei Goldau.tiff 7,356 × 9,159; 192.78 MB
-
 SBB Historic - F 111 00003 005 - Bahngebiet bei Goldau mit dem Rigi.tiff 7,282 × 9,098; 189.57 MB
-
 SBB Historic - F 111 00003 006 - Goldauer Schutt-Einschnitt.tiff 2,656 × 2,118; 11.04 MB
-
 SBB Historic - F 111 00003 007 - Goldauer-Schutteinschnitt mit den Mythen.tiff 6,000 × 4,842; 83.12 MB
-
 SBB Historic - F 111 00003 008 - Goldauerschutt.tiff 9,053 × 7,237; 187.44 MB
-
 SBB Historic - F 111 00003 009 - Lowerzerthal.tiff 6,000 × 4,845; 83.17 MB
-
 SBB Historic - F 111 00003 011 - Station Brunnen mit Urirotstock und den Bauen.tiff 9,044 × 7,216; 186.71 MB
-
 SBB Historic - F 111 00003 012 - Station Brunnen mit Urirotstock und den Bauen.tiff 9,107 × 7,301; 190.23 MB
-
 SBB Historic - F 111 00003 013 - Brunnen mit den Mythen.tiff 6,000 × 4,835; 83 MB
-
 SBB Historic - F 111 00003 014 - Vierwaldstaettersee bei Brunnen.tiff 5,500 × 4,423; 69.6 MB
-
 SBB Historic - F 111 00003 015 - Vierwaldstaettersee bei der Ausfahrt aus dem Guetschtunnel.tiff 9,210 × 7,442; 196.1 MB
-
 SBB Historic - F 111 00003 016 - Ansicht bei Ausfahrt aus dem Guetschtunnel.tiff 9,149 × 7,359; 192.63 MB
-
 SBB Historic - F 111 00003 017 - Mythensteintunnel Vierwaldstaettersee.tiff 7,304 × 9,169; 191.6 MB
-
 SBB Historic - F 111 00003 018 - Ansicht vom sogenannten Ort gegen Brunnen.tiff 9,066 × 7,177; 186.16 MB
-
 SBB Historic - F 111 00003 019 - Ansicht zwischen Brunnen und dem Ort.tiff 6,000 × 4,818; 82.71 MB
-
-
 SBB Historic - F 111 00003 021 - Sisikon.tiff 9,124 × 7,345; 191.73 MB
-
 SBB Historic - F 111 00003 022 - Gumpischbachbruecke.tiff 6,000 × 4,812; 82.6 MB
-
 SBB Historic - F 111 00003 023 - Gruenbachgallerie mit Flueelen im Hintergrund.tiff 9,126 × 7,334; 191.49 MB
-
 SBB Historic - F 111 00003 024 - Bahngebiet zwischen Gruenbach und Axenberg.tiff 6,000 × 4,814; 82.64 MB
-
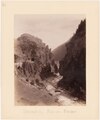
 SBB Historic - F 111 00003 025 - Gruenbachpartie mit Einblick ins Reussthal.tiff 9,114 × 7,323; 190.95 MB
-
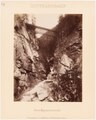
 SBB Historic - F 111 00003 026 - Gruenbach Schlucht.tiff 5,000 × 6,237; 89.22 MB
-
 SBB Historic - F 111 00003 027 - Evibachbruecke.tiff 9,081 × 7,184; 186.65 MB
-
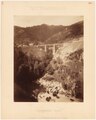
 SBB Historic - F 111 00003 028 - Amsteg mit Kerstellenbach Viaduct im Bau.tiff 6,000 × 4,816; 82.67 MB
-
 SBB Historic - F 111 00003 029 - Amsteg mit Kerstellenbach Viaduct im Bau.tiff 9,124 × 7,399; 193.14 MB
-
 SBB Historic - F 111 00003 030 - Kerstellenbachbruecke im Bau.tiff 7,332 × 9,146; 191.86 MB
-
 SBB Historic - F 111 00003 031 - Kerstellenbachbruecke nach der Vollendung.tiff 6,000 × 4,845; 83.17 MB
-
 SBB Historic - F 111 00003 032 - Amsteg mit Kerstelenbach Viaduct nach der Vollendung.tiff 8,967 × 7,386; 189.49 MB
-
 SBB Historic - F 111 00003 033 - Kerstellenbachbruecke nach der Vollendung.tiff 8,955 × 7,402; 189.64 MB
-
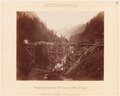
 SBB Historic - F 111 00003 034 - Intschireussbruecke im Bau.tiff 7,289 × 9,100; 189.77 MB
-
 SBB Historic - F 111 00003 035 - Intschi Reussbruecke.tiff 5,000 × 6,211; 88.85 MB
-
 SBB Historic - F 111 00003 036 - Intschi Reussbruecke.tiff 5,000 × 6,216; 88.92 MB
-
 SBB Historic - F 111 00003 037 - Zgraggenthal-Viaduct.tiff 7,329 × 9,162; 192.11 MB
-
 SBB Historic - F 111 00003 038 - Transportgeruest ueber die Reuss bei Meitschlingen.tiff 5,000 × 6,122; 87.58 MB
-
-
 SBB Historic - F 111 00003 039 - Säcken-Viadukt.tiff 9,161 × 7,344; 192.49 MB
-
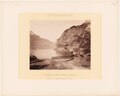
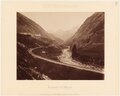
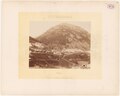
 SBB Historic - F 111 00003 040 - Das Reussthal bei Gurtnellen.tiff 9,134 × 7,324; 191.4 MB
-
 SBB Historic - F 111 00003 041 - Häggrigerbach Gallerie mit der oberen Linie.tiff 6,000 × 4,835; 83 MB
-
 SBB Historic - F 111 00003 042 - Häggrigerbach-Gallerie Pfaffensprung-Tunnel und obere Linie.tiff 7,314 × 9,119; 190.82 MB
-
 SBB Historic - F 111 00003 043 - Pfaffensprung Tunneleingang und obere Linie.tiff 7,336 × 9,088; 190.74 MB
-
 SBB Historic - F 111 00003 044 - Bild vom Kehrmaetteli bei Wassen thalabwaerts.jpg 12,810 × 10,243; 16.19 MB
-
 SBB Historic - F 111 00003 045 - Rheussthal bei Wassen.tiff 6,000 × 4,868; 83.57 MB
-
 SBB Historic - F 111 00003 046 - Untere Mayenreussbrücke mit Kirchberg und Tunnel-Portal.tiff 7,357 × 9,121; 191.98 MB
-
 SBB Historic - F 111 00003 047 - Untere Mayenreussbrücke mit Kirchbergtunneleingang.tiff 7,363 × 9,156; 192.88 MB
-
 SBB Historic - F 111 00003 048 - Mittlere und untere Mayenreussbrücke.tiff 5,000 × 6,204; 88.75 MB
-
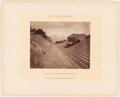
 SBB Historic - F 111 00003 049 - Reussthal bei Wassen mit Bahnlinie.tif 9,161 × 7,347; 7.42 MB
-
 SBB Historic - F 111 00003 050 - Untere Wattinger Reussbrücke.tiff 9,160 × 7,337; 192.28 MB
-
 SBB Historic - F 111 00003 051 - Gesammtbild der Wassener Schleife.tiff 9,087 × 7,350; 191.09 MB
-
 SBB Historic - F 111 00003 052 - Bahngebiet beim Dorf Wassen.tiff 6,000 × 4,806; 82.5 MB
-
 SBB Historic - F 111 00003 053 - Dorf Wassen.tiff 6,000 × 4,803; 82.45 MB
-
 SBB Historic - F 111 00003 054 - Mittlere Meienreussbruecke im Bau.tiff 9,203 × 7,233; 11.07 MB
-
 SBB Historic - F 111 00003 055 - Mittlere Meienreussbruecke.tiff 7,306 × 9,113; 190.49 MB
-
 SBB Historic - F 111 00003 056 - Mittlere Mayenreussbrücke.tiff 0 × 0; 386.08 MB
-
SBB Historic - F 111 00003 057 - Strahllochbrücke.tiff 0 × 0; 392.53 MB
-
SBB Historic - F 111 00003 058 - Obere Mayenreussbrücke.tiff 0 × 0; 394.65 MB
-
 SBB Historic - F 111 00003 059 - Obere Mayenreussbrücke.tiff 7,274 × 9,122; 189.84 MB
-
 SBB Historic - F 111 00003 060 - Obere Mayenreussbrücke.tiff 7,349 × 9,134; 192.05 MB
-
 SBB Historic - F 111 00003 061 - Obere Mayenreussbrücke mit Leggistein-Tunnelausgang.tiff 7,415 × 9,216; 195.51 MB
-
SBB Historic - F 111 00003 062 - Kellerbach Viadukt.tiff 0 × 0; 389.62 MB
-
 SBB Historic - F 111 00003 063 - Rohrbachbrücke.tiff 7,356 × 9,259; 194.86 MB
-
-
SBB Historic - F 111 00003 066 - Brücke über die Göschenenreuss.tiff 0 × 0; 390.29 MB
-
 SBB Historic - F 111 00003 068 - Station Goeschenen.tiff 9,129 × 7,326; 191.34 MB
-
 SBB Historic - F 111 00003 069 - Installationsanlage in Goeschenen.tiff 9,195 × 7,393; 194.49 MB
-
 SBB Historic - F 111 00003 070 - Compressoren.tiff 9,222 × 7,350; 193.93 MB
-
SBB Historic - F 111 00003 071 - Compressoren.tiff 0 × 0; 389.06 MB
-
SBB Historic - F 111 00003 072 - Luftlocomotive.tiff 0 × 0; 389.09 MB
-
 SBB Historic - F 111 00003 073 - Luftlocomotive.tiff 9,110 × 7,171; 186.9 MB
-
 SBB Historic - F 111 00003 074 - Bohrgestell mit Bohrmaschinen.tiff 9,196 × 7,386; 194.33 MB
-
SBB Historic - F 111 00003 075 - Bohrgestell mit Bohrmaschinen.tiff 0 × 0; 388.96 MB
-
-
 SBB Historic - F 111 00003 077 - Tunnel Eingang in Airolo vor der Vollendung.tiff 7,114 × 8,598; 175 MB
-
-
SBB Historic - F 111 00003 079 - Installationsanlage in Airolo.tiff 0 × 0; 387.66 MB
-
 SBB Historic - F 111 00003 080 - Stalvedrobruecke.tiff 9,156 × 7,372; 193.11 MB
-
 SBB Historic - F 111 00003 081 - Stalvedrobruecke.tiff 9,141 × 7,330; 191.7 MB
-
 SBB Historic - F 111 00003 082 - Stalvedro-Bruecke.tiff 8,890 × 7,354; 187.05 MB
-
 SBB Historic - F 111 00003 083 - Stalvedro, Blick von Norden.tiff 7,404 × 8,898; 188.49 MB
-
SBB Historic - F 111 00003 084 - Stalvedro Defile.tiff 0 × 0; 388.42 MB
-
SBB Historic - F 111 00003 085 - Stalvedro Defile.tiff 0 × 0; 387.68 MB
-
 SBB Historic - F 111 00003 086 - Tessinbruecke bei Dazio Grande.tiff 9,128 × 7,339; 191.66 MB
-
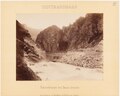
SBB Historic - F 111 00003 087 - Dazio-Schlucht.tiff 0 × 0; 389.66 MB
-
 SBB Historic - F 111 00003 088 - Dazio-Schlucht.tiff 7,268 × 8,919; 185.46 MB
-
-
SBB Historic - F 111 00003 090 - Polmengobruecke.tiff 0 × 0; 390.46 MB
-

-
SBB Historic - F 111 00003 092 - Faido.tiff 0 × 0; 388.55 MB
-
 SBB Historic - F 111 00003 093 - Fontanella Viadukt.tiff 9,134 × 7,311; 191.06 MB
-
-
SBB Historic - F 111 00003 096 - Bahnlinie in der Biaschina.tiff 0 × 0; 391.63 MB
-
-
-
 SBB Historic - F 111 00003 099 - Untere Tessinbruecke mit Giornico.tiff 9,107 × 7,323; 190.8 MB
-
 SBB Historic - F 111 00003 100 - Untere Tessinbruecke bei Giornico.tiff 9,099 × 7,262; 189.05 MB
-
SBB Historic - F 111 00003 101 - Landschaft unterhalb Giornico.tiff 0 × 0; 392.49 MB
-
 SBB Historic - F 111 00003 102 - Giornico.tiff 9,153 × 7,402; 193.84 MB
-
-
 SBB Historic - F 111 00003 104 - Tessinthal bei Biasca mit Station Biasca.tiff 9,109 × 7,319; 190.74 MB
-
 SBB Historic - F 111 00003 105 - Station Biasca.tiff 2,362 × 1,892; 12.79 MB
-
 SBB Historic - F 111 00003 106 - Bellinzona.tiff 9,180 × 7,297; 191.65 MB
-
 SBB Historic - F 111 00003 107 - Bellinzona.tiff 9,127 × 7,369; 192.42 MB
-
 SBB Historic - F 111 00003 108 - Busino-Viaduct.tiff 9,099 × 7,320; 190.56 MB
-
SBB Historic - F 111 00003 109 - Piantorino Viaduct im Bau.tiff 0 × 0; 386.55 MB
-
-
SBB Historic - F 111 00003 111 - Robasacco Bruecke.tiff 0 × 0; 388.43 MB
-
-
 SBB Historic - F 111 00003 113 - Station Lugano.tiff 9,176 × 7,451; 195.61 MB
-
 SBB Historic - F 111 00003 114 - Lugano.tiff 9,149 × 7,330; 191.87 MB
-
 SBB Historic - F 111 00003 115 - Lugano.tiff 9,092 × 7,341; 190.96 MB
-
SBB Historic - F 111 00003 116 - Lugano.tiff 0 × 0; 389.88 MB
-
 SBB Historic - F 111 00003 117 - Lugano.tiff 9,093 × 7,295; 189.78 MB
-
 SBB Historic - F 111 00003 118 - Panorama von Lugano.tiff 9,100 × 7,258; 188.96 MB
-
 SBB Historic - F 111 00003 119 - Tell-Statue in Lugano.tiff 7,322 × 9,121; 191.07 MB
-
 SBB Historic - F 111 00003 120 - Ranzo.tiff 9,076 × 7,311; 189.84 MB
-
 SBB Historic - F 111 00003 121 - Ranzo.tiff 5,000 × 6,225; 89.05 MB
-
 SBB Historic - F 115 0018 010 - Muottabruecke nach Vollendung.tif 9,097 × 7,316; 190.41 MB
-
 SBB Historic- F 111 00003 002 - Tunnelportal Seite Immensee Rindelfluh-Tunneleingang.tiff 7,576 × 9,370; 203.1 MB

