Category:Sydney Harbour Bridge in 2023
Appearance
Media in category "Sydney Harbour Bridge in 2023"
The following 73 files are in this category, out of 73 total.
-
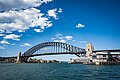
20230909 Sydney Harbour Bridge.jpg 1,800 × 1,200; 2.02 MB
-
Aboriginal Flag on Sydney Harbour bridge close up.jpg 1,440 × 1,228; 146 KB
-
AUS Sydney, Central Business District, Circular Quay 018.jpg 2,024 × 1,145; 471 KB
-
AUS Sydney, Central Business District, Circular Quay 033.jpg 1,869 × 1,401; 393 KB
-
AUS Sydney, Central Business District, Circular Quay West 009.jpg 1,379 × 1,041; 378 KB
-
AUS Sydney, Central Business District, Circular Quay West 017.jpg 1,949 × 1,462; 618 KB
-
AUS Sydney, Central Business District, Farm Cove 003.jpg 4,032 × 3,024; 2.2 MB
-
AUS Sydney, Central Business District, Farm Cove 005.jpg 4,027 × 2,343; 1.75 MB
-
AUS Sydney, Central Business District, Farm Cove 006.jpg 4,032 × 2,687; 2.05 MB
-
AUS Sydney, Central Business District, Farm Cove 007.jpg 2,125 × 964; 378 KB
-
AUS Sydney, Central Business District, Sydney Cove 003.jpg 4,032 × 3,024; 1.83 MB
-
AUS Sydney, Central Business District, Sydney Cove 004.jpg 4,032 × 3,024; 2.05 MB
-
AUS Sydney, Central Business District, Sydney Cove 011.jpg 4,032 × 3,024; 2.09 MB
-
AUS Sydney, Central Business District, Sydney Harbour 004.jpg 3,864 × 2,644; 2.23 MB
-
AUS Sydney, Central Business District, Sydney Harbour Bridge 001.jpg 3,714 × 2,785; 1.87 MB
-
AUS Sydney, Central Business District, Sydney Harbour Bridge 002.jpg 2,423 × 1,220; 472 KB
-
AUS Sydney, Central Business District, Sydney Harbour Bridge 004.jpg 3,024 × 4,032; 2.28 MB
-
AUS Sydney, Central Business District, Sydney Harbour Bridge 007.jpg 3,024 × 4,032; 2.11 MB
-
AUS Sydney, Central Business District, Sydney Harbour Bridge 008.jpg 4,032 × 3,024; 1.32 MB
-
AUS Sydney, Central Business District, Sydney Harbour Bridge 009.jpg 3,963 × 2,972; 2.22 MB
-
AUS Sydney, Central Business District, Sydney Harbour Bridge 010.jpg 2,922 × 3,897; 2.06 MB
-
AUS Sydney, Central Business District, Sydney Harbour Bridge 011.jpg 3,865 × 2,899; 2.82 MB
-
AUS Sydney, Central Business District, Sydney Harbour Bridge 012.jpg 3,897 × 2,922; 2.13 MB
-
AUS Sydney, Central Business District, Sydney Harbour Bridge 013.jpg 3,834 × 2,875; 1.81 MB
-
AUS Sydney, Central Business District, Sydney Harbour Bridge 014.jpg 3,897 × 2,922; 1.97 MB
-
AUS Sydney, Central Business District, Sydney Harbour Bridge 015.jpg 3,865 × 2,500; 1.54 MB
-
AUS Sydney, Central Business District, Sydney Harbour Bridge 016.jpg 3,623 × 2,717; 1.61 MB
-
AUS Sydney, Central Business District, Sydney Harbour Bridge 018.jpg 3,834 × 2,875; 1.47 MB
-
AUS Sydney, Central Business District, Sydney Harbour Bridge 019.jpg 3,981 × 2,986; 1.36 MB
-
AUS Sydney, Central Business District, Sydney Harbour Bridge 020.jpg 4,032 × 3,024; 2.35 MB
-
AUS Sydney, Central Business District, Sydney Harbour Bridge 021.jpg 4,032 × 3,024; 2.69 MB
-
AUS Sydney, Central Business District, Sydney Harbour Bridge 022.jpg 4,032 × 3,024; 1.71 MB
-
AUS Sydney, Central Business District, Sydney Harbour Bridge 025.jpg 3,834 × 2,405; 1.81 MB
-
AUS Sydney, Central Business District, Sydney Harbour Bridge 026.jpg 3,730 × 2,797; 1.05 MB
-
AUS Sydney, Central Business District, Sydney Harbour Bridge 027.jpg 4,032 × 3,024; 1.9 MB
-
AUS Sydney, Central Business District, Sydney Harbour Bridge 028.jpg 3,024 × 4,032; 1.76 MB
-
AUS Sydney, Central Business District, Sydney Harbour Bridge 029.jpg 4,032 × 3,024; 1.87 MB
-
AUS Sydney, Central Business District, Sydney Opera House 001.jpg 1,034 × 775; 183 KB
-
AUS Sydney, Central Business District, Sydney Opera House Forecourt 006.jpg 4,032 × 3,024; 2.4 MB
-
AUS Sydney, North Sydney, Bradfield Park, View 003.jpg 4,032 × 3,024; 2.12 MB
-
AUS Sydney, North Sydney, Bradfield Park, View 004.jpg 2,383 × 1,300; 639 KB
-
Ennis Road, outside Milsons Point railway station, Kirribilli, Sydney, 2023.jpg 5,584 × 4,187; 8.45 MB
-
IMGP6091 Bild Harbour Bridge bei Nacht.jpg 4,928 × 3,264; 7.04 MB
-
Light at Sydney Harbour Bridge, 2023, 01.jpg 1,629 × 1,452; 525 KB
-
Light at Sydney Harbour Bridge, 2023, 02.jpg 4,032 × 3,024; 2.38 MB
-
McMahons Point, New South Wales, 2023, 03.jpg 3,713 × 2,866; 2.64 MB
-
Milsons Point railway station, Ennis Road, Kirribilli, Sydney, 2023.jpg 5,273 × 5,027; 4.67 MB
-
Pacific Adventure backing out of Circular Quay.jpg 4,492 × 1,305; 2.19 MB
-
Plaque by Public Works Department of New South Wales at Sydney Harbour Bridge.jpg 6,661 × 3,259; 8.11 MB
-
Sydney CBD seen from Sydney Harbour Bridge, 2023, 01.jpg 4,032 × 3,024; 2.83 MB
-
Sydney CBD seen from Sydney Harbour Bridge, 2023, 02.jpg 3,735 × 2,801; 2.58 MB
-
Sydney Harbour Aboriginal flag2.jpg 5,039 × 3,359; 6.17 MB
-
Sydney Harbour Bridge & Opera House (20231001) (53322902670).jpg 8,148 × 5,432; 31.18 MB
-
Sydney Harbour Bridge (20231001a) (53321572002).jpg 8,175 × 5,450; 24.95 MB
-
Sydney Harbour Bridge for the Rocks.jpg 4,160 × 3,120; 2.72 MB
-
Sydney Harbour Bridge Stairs, Kirribilli, 2023, 01.jpg 5,216 × 8,213; 10.86 MB
-
Sydney Harbour Bridge Stairs, Kirribilli, 2023, 02.jpg 5,056 × 5,963; 8.97 MB
-
Sydney Harbour Bridge Stairs, Kirribilli, 2023, 03.jpg 4,078 × 5,438; 4.78 MB
-
Sydney Harbour fireworks and smoke 2023.jpg 3,466 × 2,275; 1.73 MB
-
Sydney Opera House seen from Sydney Harbour Bridge, 2023, 01.jpg 3,826 × 2,891; 2.66 MB
-
Sydney Opera House seen from Sydney Harbour Bridge, 2023, 02.jpg 3,913 × 2,820; 2.47 MB
-
Sydney Opera House seen from Sydney Harbour Bridge, 2023, 03.jpg 4,032 × 3,024; 2.95 MB
-
Sydney Opera House seen from Sydney Harbour Bridge, 2023, 04.jpg 3,511 × 2,631; 2.59 MB
-
Sydney Opera House seen from Sydney Harbour Bridge, 2023, 05.jpg 3,662 × 2,746; 2.74 MB
-
Sydney Opera House, Sydney CBD seen from Sydney Harbour Bridge, 2023, 01.jpg 5,545 × 3,454; 3.53 MB
-
Sydney Opera House, Sydney CBD seen from Sydney Harbour Bridge, 2023, 02.jpg 6,211 × 4,658; 5.43 MB
-
Sydney-blick-bruecke.jpg 4,182 × 2,827; 1.65 MB
-
USV Mariner passes under the Sydney Harbor Bridge.jpg 5,662 × 3,775; 1.24 MB
-
USV Ranger arrives Sydney, Australia, 24 October 2023.png 1,009 × 671; 1.2 MB
-
Walkway at Sydney Harbour Bridge, 2023, 01.jpg 4,032 × 3,024; 4.73 MB
-
Walkway at Sydney Harbour Bridge, 2023, 02.jpg 2,905 × 3,874; 2.95 MB
-
Walkway at Sydney Harbour Bridge, 2023, 03.jpg 2,978 × 3,356; 3.29 MB
-
Walkway at Sydney Harbour Bridge, 2023, 04.jpg 2,990 × 3,984; 3.4 MB