Category:Transport in South Australia
Jump to navigation
Jump to search
States of Australia: New South Wales · Queensland · South Australia · Tasmania · Victoria · Western Australia
Internal territories of Australia: Australian Capital Territory · Jervis Bay · Northern Territory
External territories of Australia: Christmas Island · Cocos (Keeling) Islands · Norfolk Island
Internal territories of Australia: Australian Capital Territory · Jervis Bay · Northern Territory
External territories of Australia: Christmas Island · Cocos (Keeling) Islands · Norfolk Island
English: Transport in South Australia
overview of the transport in South Australia  | |||||
| Upload media | |||||
| Instance of | |||||
|---|---|---|---|---|---|
| Part of | |||||
| Facet of | |||||
| Location | South Australia, AUS | ||||
| |||||
Subcategories
This category has the following 9 subcategories, out of 9 total.
F
L
O
P
S
V
W
Media in category "Transport in South Australia"
The following 167 files are in this category, out of 167 total.
-
 1918 MTT street tramcar design.png 7,015 × 4,121; 9.54 MB
-
-

-
-
 Adelaide horse tram no. 18 at Tramway Museum, St Kilda (background removed).png 4,397 × 6,764; 29.59 MB
-
-
-
 Adelaide in 1935.jpg 3,083 × 2,216; 3.26 MB
-

-
 Adelaide Metro Alstom 200 Series tram leaves reserved track, South Terrace.jpg 4,000 × 3,000; 11.4 MB
-
 Adelaide Metro Alstom 200 Series trams nos. 209 and 206 cross South Terrace.jpg 3,948 × 2,961; 7.09 MB
-

-
 Adelaide MTT tram Type C 186 leaves Shell Street St Kilda (RTHorne 1-3-2009) CNV00083.jpg 3,712 × 2,592; 10.86 MB
-
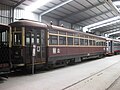
 Adelaide MTT tram Type D 192 in St Kilda museum yard (RTHorne 1-3-2009) CNV00067.jpg 3,683 × 2,455; 3.1 MB
-
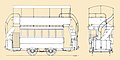
 Adelaide MTT tram Type H (small sketch) side elevation.png 896 × 259; 134 KB
-
 Adelaide MTT tram Type H1 381 at St Kilda beach (RTHorne 28-10-2017) IMG 0019.jpg 3,742 × 2,494; 9.88 MB
-

-
 Adelaide tram number 1 on trial run in North Tce 30 Nov 1908.jpg 4,412 × 2,937; 11.71 MB
-
 Adelaide trams of the four main eras -- montage, cropped tight.jpg 3,174 × 994; 2.78 MB
-
 Adelaide trams of the four main eras -- montage, grey surrounds.jpg 3,299 × 1,185; 2.58 MB
-
 Adelaide trams of the four main eras -- montage.png 3,172 × 970; 4.62 MB
-
 Adelaide Type A tram 66 en route to Kilkenny via Croydon ca 1930 (SLSA B 69647).jpg 2,880 × 1,499; 2.33 MB
-

-
 Adelaide Type A2 tram 42 in St Vincent Street, Port Adelaide, 21 Feb 1919 (SLSA B 5518).jpg 3,015 × 1,644; 1.46 MB
-
-
 Adelaide Type B trams 44 43 & 46 in Victoria Square (SLSA B 22795 cropped).jpg 3,041 × 1,588; 1.02 MB
-
 Adelaide Type C tram 179 in Currie St at King William St 16 Oct 1953.jpg 1,579 × 980; 392 KB
-

-

-
 Aerial photo of Adelaide's Hackney tram depot, Oct 1951.jpg 1,280 × 526; 330 KB
-
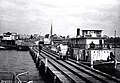
 Aerial view of Adelaide Riverbank, 1928.jpg 1,024 × 755; 456 KB
-
 Aerial view of Adelaide, 1935 (adjusted).jpg 996 × 674; 631 KB
-
 AH Landseer warehouse (Morgan Museum, South Australia).jpg 1,959 × 1,570; 1.02 MB
-
 Alstom Citadis 302 segment in storage facility, Madrid, 2009.jpg 1,145 × 1,248; 398 KB
-
 Alstom Citadis 302 tram for Adelaide on Melbourne wharf, 2009.jpg 604 × 494; 113 KB
-
 Alstom Citadis 302 trams in storage, Madrid, 2009.jpg 5,327 × 3,100; 10.09 MB
-
 Arriving at Penneshaw, Kangaroo Island.jpg 3,284 × 2,054; 1.18 MB
-
 Bird's-eye view of Glenelg train in Adelaide, 1875.jpg 6,988 × 3,364; 14.52 MB
-
 Bombardier Flexity tram from Glenelg passes SA Supreme Court, King William Street bw.jpg 3,900 × 2,091; 3.49 MB
-
 Bombardier Flexity tram interior during assembly (cropped).jpg 619 × 562; 155 KB
-
 Bombardier Flexity tram interior during assembly.jpg 619 × 827; 201 KB
-
 Bullock wagon in Ellen Street, Port Pirie, 1906 (SLSA PRG-280-1-1-322).jpg 1,022 × 339; 230 KB
-

-
 Citadis and Flexity trams cross on North Terrace, Adelaide, 14 Oct 2018 (Henk Graalman).jpg 4,295 × 3,071; 4.29 MB
-
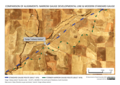 Comparison of narrow and standard gauge railway alignments in the same topography.png 3,508 × 2,479; 3.51 MB
-
 Composite image of 3 Adelaide trams -- horse tram, Type H and Type 200.jpg 6,741 × 2,698; 11.63 MB
-
 D type tram at Adelaide Tram Museum.jpg 640 × 480; 127 KB
-

-
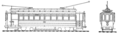
 Drawing of Glenelg tram line car, proposed, 1909.png 6,978 × 2,849; 3.78 MB
-

-
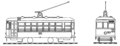
 Drawings of Glenelg tram line cars -- proposed 1909 and as built 1929.png 7,015 × 4,960; 14.15 MB
-
 Duncan and Fraser car factory interior ca 1925 (SLSA B-41640).jpg 949 × 721; 504 KB
-
 Duncan and Fraser newspaper advert (trams) ca 1910.jpg 5,002 × 3,702; 5.65 MB
-
 Duncan and Fraser wagonette (phaeton style) (SLSA B-14103-10).jpg 989 × 701; 555 KB
-

-
-

-
 Ellen Street station and streetscape, 1914 (SLSA PRG-280-1-10-47).jpg 1,024 × 565; 321 KB
-

-
 Ellen Street station, about 1929, front on (SLSA B 43855).jpg 907 × 632; 516 KB
-

-

-
 Ellen Street, about 1904 (SLSA B 9785).jpg 964 × 657; 647 KB
-
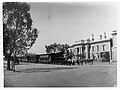
 Ellen Street, Port Pirie, and train, about 1900 (SLSA B 55173).jpg 1,024 × 679; 492 KB
-
 Erecting shop under construction, Islington Workshops, 1902 (SLSA B-12638).jpg 1,004 × 576; 372 KB
-

-

-
 Flexity tram testing switch assemblies at Glengowrie depot, April 2006.jpg 1,600 × 1,200; 2.1 MB
-
 Glenelg Railway Co. employees and locomotives at St Leonard's depot, 1881-1899.jpg 2,048 × 1,421; 1.25 MB
-

-

-
 Glenelg train ca 1890, tram 2018 King William Street Adelaide.jpg 4,323 × 5,270; 7.42 MB
-

-

-
 H type tram at Adelaide Tram Museum.jpg 640 × 480; 104 KB
-
 Hikers on Nurragi rail trail (WEA Ramblers milang-to-nurragi-north-21).jpg 1,024 × 768; 578 KB
-
 Horse tram 79, probably Kensington depot, ca 1909 (SLSA B 11037).jpg 896 × 603; 567 KB
-
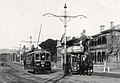 Horse tram and electric tram, North Terrace, Adelaide, 1909 (SLSA B-4364).jpg 1,008 × 697; 415 KB
-

-
 Horse tram and electric trams North Adelaide about 1909 (SLSA B8225).jpg 1,024 × 424; 452 KB
-

-
 Horse tram at depot, Unley (SLSA PRG-280-1-43-312).jpg 933 × 710; 507 KB
-
 Horse tram at intersection of King William Street and Rundle Street ca 1909.jpg 1,014 × 631; 629 KB
-
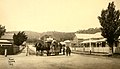
 Horse tram depot, Mitcham, 1879 -- weekendnotes.com--adelaides-public-transport.jpg 1,835 × 1,146; 2.17 MB
-
 Horse tram Glenelg-Brighton-Marino Tramways ca 1905 (SLSA B 19668).jpg 963 × 674; 464 KB
-

-
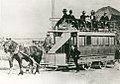
 Horse tram to Magill ca 1880 (SLSA B 26075).jpg 680 × 451; 273 KB
-
 Horse tram track and workers, Mitcham, ca 1880 (SLSA B-36052).jpg 951 × 694; 591 KB
-
 Horse trams and carriages, King William Street, Adelaide, ca 1885 (SW Sweet).jpg 2,861 × 1,736; 2.09 MB
-
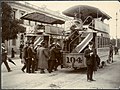 Horse trams loading on Wakefield Street Adelaide, ca 1909 (SLSA B-4398).jpg 1,024 × 764; 687 KB
-
 James Duncan and James Fraser.jpg 773 × 526; 288 KB
-

-
 King William St – North Tce tram intersection, Adelaide 2018.png 3,507 × 1,121; 851 KB
-

-
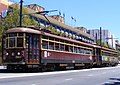
 Melbourne W2 class tram 294 on line of Tramway Museum, St Kilda (JCRadcliffe).jpg 3,800 × 2,856; 4.88 MB
-
 Melbourne W7 class tram 1013 at St Kilda Playground stop 10 Jun 2013 (JCRadcliffe).jpg 3,276 × 2,488; 5.86 MB
-
 Milang railway line aerial image.jpg 2,302 × 685; 354 KB
-
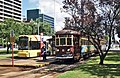
 MMMTT Type F1 tram no. 283 (for Hyde Park) at Victoria Square south on 26 Feb 1955.jpg 2,912 × 1,393; 2.86 MB
-
 MTT (Adelaide) Type F car 201, new, 17 March 1922 -- (SLSA B-836).jpg 1,013 × 521; 416 KB
-
 MTT Adelaide tram Type A (small sketch) cream bkgrd.jpg 800 × 238; 116 KB
-
 MTT Adelaide tram Type A (small sketch).png 864 × 252; 119 KB
-
 MTT Adelaide tram Type A1 (small sketch) cream bkgrd.jpg 800 × 243; 120 KB
-
 MTT Adelaide tram Type A1 (small sketch).png 879 × 265; 123 KB
-
 MTT Adelaide tram Type A2 (small sketch) cream bkgrd.jpg 800 × 242; 109 KB
-
 MTT Adelaide tram Type A2 (small sketch).png 885 × 264; 116 KB
-
 MTT Adelaide tram Type B (small sketch) cream bkgrd.jpg 800 × 246; 123 KB
-
 MTT Adelaide tram Type B (small sketch).png 867 × 261; 123 KB
-
 MTT Adelaide tram Type C (small sketch) cream bkgrd.jpg 800 × 234; 103 KB
-
 MTT Adelaide tram Type C (small sketch).png 803 × 235; 99 KB
-
 MTT Adelaide tram Type D (small sketch) cream bkgrd.jpg 800 × 234; 128 KB
-
 MTT Adelaide tram Type D (small sketch).png 977 × 277; 158 KB
-
 MTT Adelaide tram Type E (small sketch) cream bkgrd.jpg 800 × 234; 132 KB
-
 MTT Adelaide tram Type E (small sketch).png 1,232 × 356; 202 KB
-
 MTT Adelaide tram Type E1 (small sketch) cream bkgrd.jpg 800 × 235; 125 KB
-
 MTT Adelaide tram Type E1 (small sketch).png 939 × 260; 166 KB
-
 MTT Adelaide tram Type F (small sketch) cream bkgrd.jpg 800 × 217; 126 KB
-
 MTT Adelaide tram Type G (small sketch) cream bkgrd.jpg 800 × 334; 136 KB
-
 MTT Adelaide tram Type G (small sketch).png 764 × 290; 109 KB
-
 MTT Adelaide tram Type H (small sketch) cream bkgrd.jpg 800 × 216; 123 KB
-
 MTT Adelaide tram Type H (small sketch).png 1,000 × 254; 159 KB
-
 MTT Adelaide tram Type H1 (small sketch) cream bkgrd.jpg 800 × 216; 122 KB
-
 MTT Adelaide tram Type H1 (small sketch).png 1,000 × 264; 169 KB
-
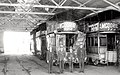
 MTT Hackney tram depot, Adelaide -- Type H and F trams at entrance to 'A' Bay, Dec 1957.jpg 2,878 × 1,748; 1.94 MB
-
 MTT Type A1 tram no. 55 at Victoria Square std rd ca 1917.jpg 991 × 597; 233 KB
-
 MTT Type D tram no. 160, Victoria Square north near Wakefield St, 25 Apr 1956.jpg 1,971 × 1,144; 1.55 MB
-
 MTT Type E1 tram no. 110 at Findon terminus, last day of operation, 18 Oct 1953.jpg 1,943 × 1,140; 1.39 MB
-
 MTT Type F tram no. 227 at Peacock Road near South Terrace, Adelaide, 9 June 1956.jpg 4,014 × 2,566; 4.69 MB
-
 MTT Type F1 tram no. 264 at Peacock Rd nr South Terrace, 9 Nov 1957.jpg 2,884 × 1,660; 2.8 MB
-

-

-
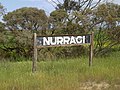 Nurragi station sign (WEA Ramblers milang-to-nurragi-north-15).jpg 800 × 600; 286 KB
-
 Old Glenelg Train in King William Street(GN12123).jpg 3,264 × 2,448; 1.02 MB
-
 Paddle steamers at Milang jetty on River Murray ca 1900 (SLSA B 59282).jpg 1,024 × 712; 637 KB
-
 Partially assembled tram body (MTT Type E), Brill Company, Philadelphia 1910.jpg 5,821 × 2,787; 6.08 MB
-

-
 Photos of Adelaide's Municipal Tramways Trust inaugural directors and staff, 1909.jpg 1,709 × 1,190; 886 KB
-

-

-
 Port Pirie smelters -- coming off shift circa 1904 (SLSA B 11617).jpg 948 × 574; 524 KB
-

-
 Refurbished 300 Series trams 370 and 380, North Tce, Adelaide, January 2009.jpg 1,950 × 1,379; 2.6 MB
-

-
-
 SAR Bluebird railcar Commonwealth bogie.jpg 853 × 318; 302 KB
-

-

-
 Sealion 2000 arriving at penneshaw.JPG 1,455 × 1,032; 554 KB
-
 Sketch -- Adelaide 100 Series (Flexity Classic) tram on cream background.jpg 3,341 × 647; 461 KB
-
 Sketch -- Adelaide 100 Series (Flexity Classic) tram.jpg 3,308 × 628; 354 KB
-
 Sketch -- Adelaide 200 Series (Citadis 302) tram.png 815 × 119; 93 KB
-
 Sketch -- Adelaide Citadis 302 on cream background.png 6,743 × 1,149; 1.95 MB
-
 Sketch -- Adelaide Type H tram on cream background.png 5,921 × 2,001; 2.4 MB
-
 South Australian Railways Islington Workshops -- distant view pre 1927 (SLSA B4403).jpg 3,530 × 1,321; 2.89 MB
-

-

-
 Sydney R1 class tram 1971 at St Kilda SA Playground stop, 2 Jan 2006 (JCRadcliffe).jpg 2,224 × 1,550; 2.61 MB
-
-
 Timeline chart -- Adelaide's tram systems 1878 to 2022.tif 2,308 × 1,285; 11.32 MB
-

-
 Tram track construction in King William St, near Waymouth St, Adelaide, 20 May 2007.jpg 1,808 × 1,350; 2.07 MB
-

-

-

-
 Type H Glenelg tram interior 2005.jpg 1,745 × 1,139; 2.05 MB
-
 Type H tram 364 between Stops 11 and 12, Glenelg line, July 1972.jpg 2,612 × 1,772; 2.5 MB
-

-
 Wool wagons at Milang, about 1876 (SLSA B 8284).jpg 994 × 287; 128 KB

.jpg)
.jpg)
.jpg)
.png)
.jpg)
.jpg)

_tram_number_202_at_Glenelg_terminus_28_Dec_2012_(cropped).jpg)


_CNV00083.jpg)
_CNV00067.jpg)
_IMG_0019.jpg)
.jpg)

.jpg)
.jpg)
.jpg)

.jpg)


_depot,_1873_(SLSA_B-5439).jpg)

.jpg)
.jpg)


.jpg)


.jpg)


.jpg)
.png)

.jpg)
_ca_1910.jpg)
_(SLSA_B-14103-10).jpg)
.jpg)
.jpg)
.jpg)
.jpg)
.jpg)
.jpg)
.jpg)
.jpg)
.jpg)
.jpg)
.jpg)
.jpg)
.jpg)


.jpg)
,_King_William_Street_terminus,_Adelaide,_1899-1908_(SLSA_B-4397).jpg)


.jpg)
.jpg)
.jpg)
.jpg)
.jpg)
.jpg)
.jpg)

.jpg)
.jpg)
.jpg)
.jpg)
.jpg)
.jpg)

.jpg)
.jpg)
.jpg)
.jpg)
_at_Victoria_Square_south_on_26_Feb_1955.jpg)
_Type_F_car_201,_new,_17_March_1922_--_(SLSA_B-836).jpg)
_cream_bkgrd.jpg)


.jpg)
.jpg)
.jpg)
.jpg)
,_Brill_Company,_Philadelphia_1910.jpg)
.jpg)

.jpg)
.jpg)
.jpg)
.jpg)

_tram_303_on_Glenelg_line_level_crossing_over_Greenhill_Road,_Adelaide,_Jun_1978_(Henk_Graalman).jpg)
.jpg)
.jpg)
.jpg)


.jpg)
.jpg)
.jpg)
_and_horse_tram,_O%27Connell_and_Ward_Streets_intersection,_North_Adelaide_ca_1909_(SLSA_B8225_cropped).jpg)

.jpg)
.jpg)
,_Currie_Street,_Adelaide_1917_(SLSA_PRG-733-12).jpg)


.jpg)
_side_elevation.png)
.jpg)
.jpg)
_cream_bkgrd.jpg)
.png)
_cream_bkgrd.jpg)
.png)
_cream_bkgrd.jpg)
.png)
_cream_bkgrd.jpg)
.png)
_cream_bkgrd.jpg)
.png)
_cream_bkgrd.jpg)
.png)
_cream_bkgrd.jpg)
.png)
_cream_bkgrd.jpg)
.png)
_cream_bkgrd.jpg)
.png)
_cream_bkgrd.jpg)
.png)
_cream_bkgrd.jpg)
.png)
_tram_on_cream_background.jpg)
_tram.jpg)
_tram.png)
.jpg)
.jpg)