File:Helmet, camouflage (AM 1959.72-2).jpg
Jump to navigation
Jump to search

Size of this preview: 642 × 600 pixels. Other resolutions: 257 × 240 pixels | 514 × 480 pixels | 822 × 768 pixels | 1,097 × 1,024 pixels | 2,193 × 2,048 pixels | 3,480 × 3,250 pixels.
Original file (3,480 × 3,250 pixels, file size: 1.15 MB, MIME type: image/jpeg)
Captions
Captions
Add a one-line explanation of what this file represents
Summary
[edit]| Helmet, camouflage
( |
||||||||||||||||||||||||
|---|---|---|---|---|---|---|---|---|---|---|---|---|---|---|---|---|---|---|---|---|---|---|---|---|
| Artist |
not researched |
|||||||||||||||||||||||
| Title |
Helmet, camouflage |
|||||||||||||||||||||||
| Object type | Classification: 75616 | |||||||||||||||||||||||
| Description |
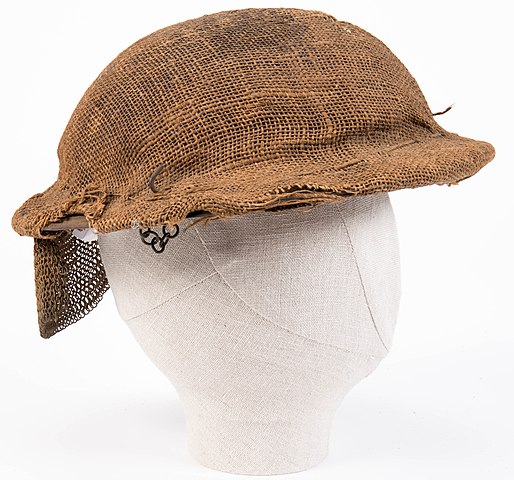
English: British tank driver's steel helmet with hessian camouflage cover and chain mail mesh visor, WW1 Collection- 7-1315 Major William George Wray, 2nd Battalion Otago Infantry Battalion, NZEF |
|||||||||||||||||||||||
| Date | World War 1, 1914-18-wars; 1959; 06 Jul 1959; (1916-1918) | |||||||||||||||||||||||
| Dimensions |
length: 330mm |
|||||||||||||||||||||||
| Collection |
|
|||||||||||||||||||||||
| Accession number |
1959.72 |
|||||||||||||||||||||||
| Place of creation | United Kingdom; Western Front | |||||||||||||||||||||||
| Exhibition history | Display: 36808 | |||||||||||||||||||||||
| Credit line | Collection of Auckland Museum Tamaki Paenga Hira, W1390 | |||||||||||||||||||||||
| Notes | British tank driver's steel helmet with camouflage cover and mesh visor, WW1 Collected by 7-1315 Major William George Wray, Canterbury Mounted Rifles, and 2nd Battalion Otago Infantry Battalion, WW1 With previous service in South Africa and with the volunteers William Wray was commissioned as Captain when he enlisted with the Canterbury Mounted Rifles in 1915. He embarked for Egypt with the 6th Reinforcements on 14th August 1915. In March 1916 he transferred to 2nd Company Otago Infantry Battalion to serve on the Western Front. On 15th September 1916 Captain Wray received a severe gunshot wound to the left shoulder and hand during the attack on Switch Line, on the Somme. He was awarded the Military Cross for his bravery under fire and, despite being wounded, for his inspiring example. He was again wounded on 31st May 1917 (June 1st), while quartered at Hill 63 during the lead-up to the Battle of Messines a shell burst outside his quarters and Major Wray was evacuated back to England. This was the end of his front-line service. In February 1918 he was given command of troops on a returning transport HMS Tahiti, but shortly after his return to New Zealand Wray was discharged from the NZEF as no longer fit for active service. | |||||||||||||||||||||||
| Source/Photographer | Photo | |||||||||||||||||||||||
| Permission (Reusing this file) |
This image has been released as "CCBY" by Auckland Museum. For details refer to the Commons project page. | |||||||||||||||||||||||
| Other versions |
|
|||||||||||||||||||||||

.jpg)
.jpg)
.jpg)
.jpg)
.jpg)
.jpg)
.jpg)
.jpg)
.jpg&action=edit§ion=1)
Licensing
[edit].jpg&action=edit§ion=2)
This file is licensed under the Creative Commons Attribution 4.0 International license.
Attribution: Auckland Museum
- You are free:
- to share – to copy, distribute and transmit the work
- to remix – to adapt the work
- Under the following conditions:
- attribution – You must give appropriate credit, provide a link to the license, and indicate if changes were made. You may do so in any reasonable manner, but not in any way that suggests the licensor endorses you or your use.
File history
Click on a date/time to view the file as it appeared at that time.
| Date/Time | Thumbnail | Dimensions | User | Comment | |
|---|---|---|---|---|---|
| current | 18:55, 22 January 2018 | | 3,480 × 3,250 (1.15 MB) | Fæ (talk | contribs) | Auckland Museum Page 581.49 Object #58148 1959.72 Image 2/11 http://api.aucklandmuseum.com/id/media/v/363970 |
You cannot overwrite this file.
File usage on Commons
The following 10 pages use this file:
- File:Helmet, camouflage (AM 1959.72-1).jpg
- File:Helmet, camouflage (AM 1959.72-10).jpg
- File:Helmet, camouflage (AM 1959.72-2).jpg
- File:Helmet, camouflage (AM 1959.72-3).jpg
- File:Helmet, camouflage (AM 1959.72-4).jpg
- File:Helmet, camouflage (AM 1959.72-5).jpg
- File:Helmet, camouflage (AM 1959.72-6).jpg
- File:Helmet, camouflage (AM 1959.72-7).jpg
- File:Helmet, camouflage (AM 1959.72-8).jpg
- File:Helmet, camouflage (AM 1959.72-9).jpg
.jpg)
.jpg)
.jpg&oldid=848978719)