Category:Military of Australia
Jump to navigation
Jump to search
Australia | ||
|---|---|---|
| ||
|
combined military forces of Australia  | |||||
| Upload media | |||||
| Instance of | |||||
|---|---|---|---|---|---|
| Location |
| ||||
| Has part(s) |
| ||||
| Inception |
| ||||
| |||||
Subcategories
This category has the following 45 subcategories, out of 45 total.
Media in category "Military of Australia"
The following 124 files are in this category, out of 124 total.
-
 "The Empire Needs Men!" Recruitment poster for World War I (14842191503).jpg 2,873 × 4,365; 1.86 MB
-
 (6) 1959 Kurdruko, Ambassador for Russia, credentials - kopie.jpg 3,960 × 3,123; 6.14 MB
-
 140411-M-SE196-001 (13851721945).jpg 5,760 × 3,840; 3.67 MB
-
 140411-M-SE196-011 (13870441484).jpg 5,760 × 3,840; 3.01 MB
-
 140514-A-RJ750-028 (14213743726).jpg 5,760 × 3,840; 5.56 MB
-
 160708-M-NL297-018 (27646193353).jpg 5,201 × 3,467; 1.42 MB
-
 220A0005 (46982735565).jpg 1,024 × 683; 340 KB
-
 220A9862 (47846678842).jpg 1,024 × 536; 278 KB
-
 220A9864 (47109509374).jpg 1,024 × 683; 307 KB
-
 220A9871 (47846677712).jpg 1,024 × 571; 282 KB
-
 ABP complete first 8-week course (6143396396).jpg 2,367 × 1,572; 1.07 MB
-
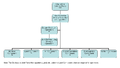 ADF Command Structure 2004.PNG 992 × 564; 20 KB
-
 ADF strengths 90-06.JPG 1,014 × 643; 38 KB
-

-
 Australia war memorial, London (detail).JPG 2,821 × 1,715; 1.26 MB
-
-

-
 Australian Memorial Wellington.jpg 2,570 × 1,220; 672 KB
-
 Australian Tankers qualify with 1st Tanks 130222-M-LV138-858.jpg 4,896 × 3,264; 10.52 MB
-
 Australian veteran.jpg 669 × 1,024; 114 KB
-
 Australian War Memorial, London, detail 1.JPG 3,488 × 2,616; 2.66 MB
-
 Australian War Memorial, London, detail 2.JPG 3,488 × 2,616; 2.82 MB
-
 Australian defense. (IA australiandefens00astl).pdf 1,208 × 1,641, 234 pages; 6.19 MB
-
 Braidwood War Memorial.jpg 1,009 × 768; 62 KB
-
 C-17 Australians (USAF).jpg 2,976 × 1,984; 1.03 MB
-
 Campbellparkoffices.jpg 2,448 × 3,264; 2.95 MB
-

-
 Dedication of the Australian Memorial 01.JPG 4,608 × 3,456; 3.86 MB
-
 Dedication of the Australian Memorial 02.JPG 4,608 × 3,456; 4.11 MB
-
 Dedication of the Australian Memorial 03.JPG 4,608 × 3,456; 4.23 MB
-
 Dedication of the Australian Memorial 04.JPG 4,608 × 3,456; 4.64 MB
-
 Dedication of the Australian Memorial 05.JPG 4,608 × 3,456; 4.57 MB
-
 Dedication of the Australian Memorial, close up 01.JPG 4,608 × 3,456; 3.39 MB
-
 Dedication of the Australian Memorial, close up 02.JPG 3,456 × 4,608; 3.39 MB
-
 Dedication of the Australian Memorial, close up 03.JPG 3,456 × 4,608; 4.09 MB
-
 Defense.gov photo essay 120713-O-ZZ999-004.jpg 2,096 × 1,397; 2.79 MB
-
 Defense.gov photo essay 120716-F-MQ656-062.jpg 1,800 × 1,200; 1.82 MB
-
 Defense.gov photo essay 120716-F-MQ656-186.jpg 1,797 × 1,198; 808 KB
-
 Defense.gov photo essay 120716-F-MQ656-316.jpg 1,688 × 1,125; 736 KB
-
 Defense.gov photo essay 120716-F-MQ656-426.jpg 1,797 × 1,198; 1.92 MB
-
 Defense.gov photo essay 120731-O-ZZ999-010.jpg 3,869 × 2,579; 5.25 MB
-
 Defense.gov photo essay 120801-N-KW566-001.jpg 1,956 × 1,304; 1.54 MB
-
 Defense.gov photo essay 120801-N-KW566-005.jpg 2,076 × 2,624; 1.93 MB
-
 Defense.gov photo essay 120820-N-OT964-471.jpg 4,248 × 2,832; 1.86 MB
-
 Defense.gov photo essay 120824-N-OT964-445.jpg 3,817 × 2,545; 2.58 MB
-
 East timor independence un2.jpg 2,048 × 1,536; 1.32 MB
-
 Engineers from the Australian Defence Force.jpg 3,456 × 2,592; 4.21 MB
-
 Farewell to the troopship ASCANIUS (7978545140).jpg 3,543 × 2,593; 573 KB
-
 Farewell to the troopship BARAMBAH (7978383148).jpg 3,543 × 2,423; 582 KB
-
 Flintlock 2017 counter-IED training in Niger 170301-A-BV528-002.jpg 4,620 × 3,040; 8.08 MB
-
 Flintlock 2017 react to contact drills in Niger 170302-A-UW671-019.jpg 5,472 × 3,648; 12.92 MB
-
 Flintlock 2017 training in Niger 170228-A-UW671-046.jpg 2,000 × 1,333; 1.25 MB
-
 Flintlock 2017 training in Niger 170304-A-UW671-096.jpg 5,472 × 3,648; 8.74 MB
-
 Forum sig.png 600 × 150; 17 KB
-

-
 JTACs from Australia, Canada, UK and US in virtual CAS exercise.JPG 2,848 × 4,288; 6.6 MB
-

-
 Military parade and demonstration at the Dedication of the Australian Memorial 01.JPG 4,608 × 3,456; 5.16 MB
-
 Military parade and demonstration at the Dedication of the Australian Memorial 02.JPG 4,608 × 3,456; 5.58 MB
-
 Military parade and demonstration at the Dedication of the Australian Memorial 03.JPG 4,608 × 3,456; 6.13 MB
-
 Military parade and demonstration at the Dedication of the Australian Memorial 04.JPG 4,608 × 3,456; 6.51 MB
-
 Our Boys at the Front (14797916981).jpg 806 × 513; 366 KB
-
 PineGap-sign.jpg 1,741 × 1,159; 231 KB
-
 Portrait Frank Albert of the Royal Sydney Yacht Squadron (7436143700).jpg 2,308 × 3,134; 468 KB
-
 Portrait of a bagpipe band (7443922294).jpg 2,399 × 1,948; 2.58 MB
-
 Project Uncut.png 1,000 × 314; 45 KB
-

-

-

-

-

-

-

-

-
 React to contact drills during Flintlock 2017 in Niger 170303-A-BV528-001.jpg 2,000 × 1,004; 1.52 MB
-
 Recruiting Soldier (5600196405).jpg 683 × 1,024; 139 KB
-
 Recruiting Soldier (5600779456).jpg 683 × 1,024; 154 KB
-
 Riley Chaplain-General.jpg 291 × 368; 53 KB
-
 RIMPAC Hawaii Amphibious Assault 2018 (50056774506).jpg 2,952 × 1,934; 616 KB
-
 Russell Offices.JPG 992 × 744; 382 KB
-
 Secretary Kerry Attends Bastille Day Festivities in Paris, France (28019791770).jpg 4,567 × 3,039; 2.54 MB
-
 SH 60F Sea Hawk helicopter in the Solomon Islands.jpg 2,100 × 1,500; 430 KB
-
 Small unit tactics training during Flintlock 2017 in Niger 170302-A-UW671-026.jpg 5,472 × 3,648; 15.58 MB
-
 Soldier in a machine gun shelter, ca1940 (27810749934).jpg 1,200 × 879; 392 KB
-
 Soldier on horse, ca1917 (28144458800).jpg 1,200 × 827; 339 KB
-
 Soldiers-settlement-reserve.jpg 800 × 457; 171 KB
-
 StateLibQld 1 101360.jpg 1,000 × 765; 75 KB
-
-
 StateLibQld 1 113260 Procession on Jubilee Day, Warwick, June 1897.jpg 1,000 × 708; 110 KB
-
 StateLibQld 1 123297 Crew of the Freda taken on deck, Port Moresby, 1946.jpg 1,000 × 629; 72 KB
-

-

-
 StateLibQld 1 158721 Soldiers boarding troopship, Brisbane, World War I.jpg 1,000 × 748; 122 KB
-
 StateLibQld 1 188715 De Dion Bouton at Lytton training camp, ca. 1915.jpg 1,000 × 705; 98 KB
-
 StateLibQld 2 181047 Ida Axelsen, 1919.jpg 669 × 1,000; 60 KB
-

-
 Steyr AUG DF-SD-06-01774.jpg 1,750 × 2,785; 1.56 MB
-
 Swan island map.PNG 539 × 494; 21 KB
-
 Tasmania c.1913 members of Pre WWI militia.jpg 640 × 471; 181 KB
-
 The Foreign Secretary James Cleverly visits Salisbury Plain (52663579768).jpg 4,000 × 2,668; 3.1 MB
-
 Tomb of Unknown Soldier, Wellington, New Zealand 01.JPG 4,608 × 3,456; 3.66 MB
-
 Tomb of Unknown Soldier, Wellington, New Zealand 02.JPG 4,608 × 3,456; 4.57 MB
-
 Tony Abbott and John Key 02.JPG 4,608 × 3,456; 5.08 MB
-
 Tony Abbott and John Key 03.JPG 4,608 × 3,456; 5.31 MB
-
 Tony Abbott and John Key farewelled at Dedication of the Australian Memorial.JPG 4,608 × 3,456; 3.15 MB
-
 Tony Abbott and John Key survey military demonstration.JPG 4,608 × 3,456; 5.44 MB
-

-
 Untitled portrait of a soldier (7457971858).jpg 666 × 919; 241 KB
-

-

-

-

-
 USMC-100712-M-5241-087.jpg 1,270 × 1,680; 249 KB
-
 Victoria Barracks - A Block.jpg 5,564 × 3,709; 13.43 MB
-
 View of Townsville from Mt Stuart.jpg 2,592 × 1,944; 2.12 MB
-
 Volunteer Parade Gurwood Street 1880s RW2893.2.jpg 2,854 × 1,874; 2.69 MB
-
 Wangaratta war memorials.JPG 431 × 574; 97 KB
-
 Water tank in Sapang Bato (10712071064).jpg 2,592 × 3,456; 4.42 MB
-
 WM39-45obv.jpg 382 × 435; 113 KB
-
 WM39-45rev.jpg 385 × 440; 100 KB
-
 Wolseley fuel tanks.jpg 2,040 × 1,041; 432 KB
-
 Woomera-warning-sign.JPG 1,280 × 960; 290 KB
-
 Wreaths at Australian Memorial.JPG 4,608 × 3,456; 3.82 MB
-

.jpg)
_1959_Kurdruko,_Ambassador_for_Russia,_credentials_-_kopie.jpg)
.jpg)
.jpg)
.jpg)
.jpg)
.jpg)
.jpg)
.jpg)
.jpg)
.jpg)


.JPG)
.jpg)


.jpg)


.jpg)
.jpg)


.jpg)

.jpg)
.jpg)


.jpg)
.jpg)

.jpg)

.jpg)


.jpg)
.jpg)


.jpg)


.jpg)
.jpg)
_for_debarkation_training_in_preparation_of_Talisman_Sabre_2005.jpg)

.jpg)
_for_a_tour_of_the_ship.jpg)


.jpg)


_%D1%83_%D0%A1%D1%96%D0%B4%D0%BD%D0%B5%D1%97_(45593929471).jpg)